在Flask中,路由是将URL请求分配到相应的处理程序的方法。每个路由可以映射到一个特定的视图(视图函数或方法)。一个WEB应用不同的路径会有不同的处理函数,路由就是根据请求的URL找到对应处理函数的过程。在执行查找之前,需要有一个规则列表,它存储了url和处理函数的对应关系。最容易想到的解决方案就是定义一个字典,key是url,value是对应的处理函数。如果url都是静态的(url路径都是实现确定的,没有变量和正则匹配),那么路由的过程就是从字典中通过url这个key,找到并返回对应的value;如果没有找到,就报404错误。而对于动态路由,还需要更复杂的匹配逻辑。
基本路由
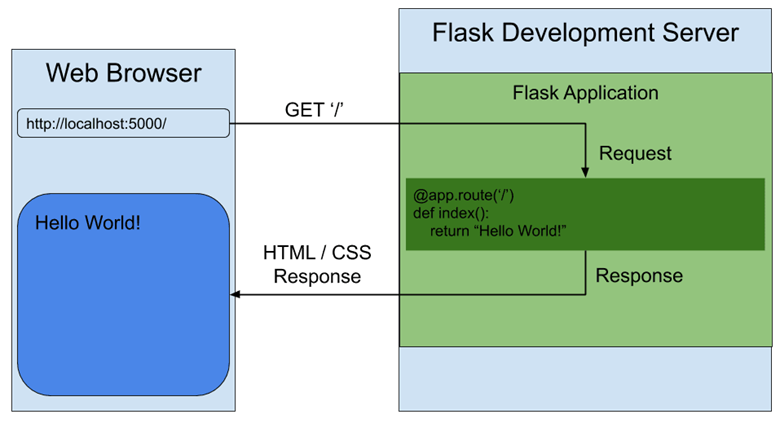
Flask中的路由使用route()装饰器来定义。如下所示:
from flask import Flask

app = Flask(__name__)

@app.route('/')
def index():
    return 'Hello, World!'
上述代码中,我们使用@app.route()装饰器将一个URL路径(/)与一个视图函数(index())关联在一起。这个视图函数将会在访问路径为/时被调用,返回一个包含”Hello, World!”字样的响应。从HelloWorld中,我们了解到URL的路由可以直接写在其要执行的函数上。有人会质疑,这样不是把Model和Controller绑在一起了吗?的确,如果你想灵活的配置Model和Controller,这样是不方便,但是对于轻量级系统来说,灵活配置意义不大,反而写在一块更利于维护。Flask路由规则都是基于Werkzeug的路由模块的,它还提供了很多强大的功能。
在使用Flask的路由时,有一些注意事项需要记住:
- 路由顺序:Flask会按照定义的路由顺序进行匹配。因此,当定义多个路由规则时,确保将更具体的规则放在前面,以避免被覆盖。
- URL斜线:Flask默认处理URL路径时忽略末尾的斜线。例如,’/about’和’/about/’是等效的。如果你想强制要求斜线,可以在路由规则中添加strict_slashes=True参数。
@app.route()与app.add_url_rule()
在Flask中,可以有2种方法实现路由:
- 通过@app.route() decorator,比如文章开头给出的helloworld例子
- Flask提供了@app.route()装饰器来定义路由规则。除了基本的路由规则外,该装饰器还支持其他参数,如defaults、subdomain、host等。你可以根据需要使用这些参数来自定义路由行为。
- 通过add_url_rule,这个方法的签名为add_url_rule(self, rule, endpoint=None, view_func=None, **options),参数的含义如下:
- rule:url规则字符串,可以是静态的/path,也可以包含/
- endpoint:要注册规则的endpoint,默认是view_func的名字
- view_func:对应url的处理函数,也被称为视图函数
这两种方法是等价的,也就是说:
@app.route('/')
def hello():
    return "hello, world!"
也可以写成:
def hello():
    return "hello, world!"

app.add_url_rule('/', 'hello', hello)
NOTE:其实,还有一种方法来构建路由规则——直接操作app.url_map这个数据结构。不过这种方法并不是很常用,因此就不展开了。
注册路由规则的时候,flask内部做了哪些东西呢?我们来看看route方法:
def route(self, rule, **options):
    """A decorator that is used to register a view function for a
    given URL rule. This does the same thing as:meth:`add_url_rule`
    but is intended for decorator usage.
    """

    def decorator(f):
        endpoint = options.pop('endpoint', None)
        self.add_url_rule(rule, endpoint, f, **options)
        return f

    return decorator
route方法内部也是调用add_url_rule,只不过在外面包了一层装饰器的逻辑,这也验证了上面两种方法等价的说法。
def add_url_rule(self, rule, endpoint=None, view_func=None, **options):
    """Connects a URL rule. Works exactly like the:meth:`route`
    decorator. If a view_func is provided it will be registered with the
    endpoint.
    """

    methods = options.pop('methods', None)

    rule = self.url_rule_class(rule, methods=methods, **options)
    self.url_map.add(rule)
    if view_func is not None:
        old_func = self.view_functions.get(endpoint)
        if old_func is not None and old_func != view_func:
            raise AssertionError('View function mapping is overwriting an'
                               ' existing endpoint function: %s' % endpoint)
        self.view_functions[endpoint] = view_func
上面这段代码省略了处理endpoint和构建methods的部分逻辑,可以看到它主要做的事情就是更新self.url_map和self.view_functions两个变量。找到变量的定义,发现url_map是werkzeug.routeing:Map类的对象,rule是werkzeug.routing:Rule类的对象,view_functions就是一个字典。这和我们之前预想的并不一样,这里增加了Rule和Map的封装,还把url和view_func保存到了不同的地方。
需要注意的是:每个视图函数的endpoint必须是不同的,否则会报AssertionError。
总结:装饰器更加优雅,看起来更加清晰,url和视图函数关系明确,非常适合中小型项目。add_url_rule集中注册,更加灵活,把所有的url路由都定义到了一起,当某一个路由出现问题的适合,很快就能找到改路由,不能到各个视图函数文件中找,适合中大型项目。
endpoint
在Flask中,每个路由都需要一个唯一的标识符,这个标识符通常被称为”endpoint”。Endpoint是指向特定视图的名字,可以用来生成URL和重定向到对应的视图。
默认情况下,Flask会将endpoint设置为视图函数的名称。例如:
from flask import Flask

app = Flask(__name__)

@app.route('/')
def index():
    return 'Hello, World!'
在上面的示例中,Flask将index作为视图函数index()的endpoint。
如果我们需要自定义endpoint的名字,可以使用endpoint参数来指定。例如:
from flask import Flask

app = Flask(__name__)

@app.route('/', endpoint='home')
def index():
    return 'Hello, World!'
在上面的示例中,我们使用endpoint=’home’来指定index的endpoint为home。
我们还可以使用url_for()函数来生成URL,这个函数接收endpoint作为参数。例如:
from flask import Flask, url_for

app = Flask(__name__)

@app.route('/', endpoint='home')
def index():
    return 'Hello, World!'

with app.test_request_context():
    print(url_for('home'))  # 输出:/
在这个示例中,我们使用url_for(‘home’)来生成/路径的URL,因为home是index的endpoint。
总之,endpoint是Flask中路由的重要属性,它用来唯一标识一个视图。通过合理地定义endpoint,我们可以更加灵活地生成URL和重定向到对应的视图,提高应用程序的可维护性和可扩展性。
Flask路由原理
werkzeug路由逻辑
事实上,flask核心的路由逻辑是在 werkzeug 中实现的。所以在继续分析之前,我们先看一下 werkzeug 提供的路由功能。
>>> m = Map([
... Rule('/', endpoint='index'),
... Rule('/downloads/', endpoint='downloads/index'),
... Rule('/downloads/<int:id>', endpoint='downloads/show')
... ])
>>> urls = m.bind("example.com", "/")
>>> urls.match("/", "GET")
('index', {})
>>> urls.match("/downloads/42")
('downloads/show', {'id': 42})

>>> urls.match("/downloads")
Traceback (most recent call last):
...
RequestRedirect: http://example.com/downloads/
>>> urls.match("/missing")
Traceback (most recent call last):
...
NotFound: 404 Not Found
上面的代码演示了 werkzeug 最核心的路由功能:添加路由规则(也可以使用 m.add),把路由表绑定到特定的环境(m.bind),匹配url(urls.match)。正常情况下返回对应的endpoint名字和参数字典,可能报重定向或者404异常。
可以发现,endpoint 在路由过程中非常重要。werkzeug 的路由过程,其实是url到endpoint的转换:通过url找到处理该url的endpoint。至于endpoint和view function之间的匹配关系,werkzeug 是不管的,而上面也看到 flask 是把这个存放到字典中的。
Flask路由实现
好,有了这些基础知识,我们回头看 dispatch_request,继续探寻路由匹配的逻辑:
def dispatch_request(self):
    """Does the request dispatching. Matches the URL and returns the
    return value of the view or error handler. This does not have to
    be a response object. In order to convert the return value to a
    proper response object, call:func:`make_response`.
    """

    req = _request_ctx_stack.top.request
    if req.routing_exception is not None:
        self.raise_routing_exception(req)
    rule = req.url_rule

    # dispatch to the handler for that endpoint
    return self.view_functions[rule.endpoint](**req.view_args)
这个方法做的事情就是找到请求对象 request,获取它的 endpoint,然后从 view_functions 找到对应 endpoint 的 view_func ,把请求参数传递过去,进行处理并返回。view_functions 中的内容,我们已经看到,是在构建路由规则的时候保存进去的;那请求中 req.url_rule 是什么保存进去的呢?它的格式又是什么?
我们可以先这样理解:_request_ctx_stack.top.request 保存着当前请求的信息,在每次请求过来的时候,flask 会把当前请求的信息保存进去,这样我们就能在整个请求处理过程中使用它。
_request_ctx_stack 中保存的是 RequestContext 对象,它出现在 flask/ctx.py 文件中,和路由相关的逻辑如下:
class RequestContext(object):
    def __init__(self, app, environ, request=None):
        self.app = app
        self.request = request
        self.url_adapter = app.create_url_adapter(self.request)
        self.match_request()

    def match_request(self):
        """Can be overridden by a subclass to hook into the matching
        of the request.
        """
        try:
            url_rule, self.request.view_args = \
                self.url_adapter.match(return_rule=True)
            self.request.url_rule = url_rule
        except HTTPException as e:
            self.request.routing_exception = e


class Flask(_PackageBoundObject):
    def create_url_adapter(self, request):
        """Creates a URL adapter for the given request. The URL adapter
        is created at a point where the request context is not yet set up
        so the request is passed explicitly.
        """
        if request is not None:
            return self.url_map.bind_to_environ(request.environ,
                server_name=self.config['SERVER_NAME'])
在初始化的时候,会调用 app.create_url_adapter 方法,把 app 的 url_map 绑定到 WSGI environ 变量上(bind_to_environ 和之前的 bind 方法作用相同)。最后会调用 match_request 方法,这个方式调用了 url_adapter.match 方法,进行实际的匹配工作,返回匹配的 url_rule。而我们之前使用的 url_rule.endpoint 就是匹配的 endpoint 值。
整个 flask 的路由过程就结束了,总结一下大致的流程:
通过 @app.route 或者 app.add_url_rule 注册应用 url 对应的处理函数
每次请求过来的时候,会事先调用路由匹配的逻辑,把路由结果保存起来
dispatch_request 根据保存的路由结果,调用对应的视图函数
match 实现
虽然讲完了 flask 的路由流程,但是还没有讲到最核心的问题:werkzeug 中是怎么实现 match 方法的。Map 保存了 Rule 列表,match 的时候会依次调用其中的 rule.match 方法,如果匹配就找到了 match。Rule.match 方法的代码如下:
def match(self, path):
    """Check if the rule matches a given path. Path is a string in the
    form ``"subdomain|/path(method)"`` and is assembled by the map. If
    the map is doing host matching the subdomain part will be the host
    instead.

    If the rule matches a dict with the converted values is returned,
    otherwise the return value is `None`.
    """
    if not self.build_only:
        m = self._regex.search(path)
        if m is not None:
            groups = m.groupdict()

            result = {}
            for name, value in iteritems(groups):
                try:
                    value = self._converters[name].to_python(value)
                except ValidationError:
                    return
                result[str(name)] = value
            if self.defaults:
                result.update(self.defaults)

            return result
它的逻辑是这样的:用实现 compile 的正则表达式去匹配给出的真实路径信息,把所有的匹配组件转换成对应的值,保存在字典中(这就是传递给视图函数的参数列表)并返回。
动态路由
在 Flask 中,我们可以定义一个动态路由,将动态参数包含在 URL 中。例如:
from flask import Flask

app = Flask(__name__)

@app.route('/user/')
def show_user_profile(username):
    return f'User {username}'
在这个示例中,
你还可以在 URL 参数前添加转换器来转换参数类型,我们再来加个函数:
@app.route('/user/')
def get_user(user_id):
    return 'User ID: %d' % user_id
试下访问 http://localhost:5000/user/man,你会看到 404 错误。但是试下 http://localhost:5000/user/123,页面上就会有”User ID: 123”显示出来。参数类型转换器 int: 帮你控制好了传入参数的类型只能是整形。目前支持的参数类型转换器有:
| 类型 | 描述 |
| string | (缺省值)接受任何不包含斜杠的文本 |
| int | 接受正整数 |
| float | 接受正浮点数 |
| path | 类似 string,但可以包含斜杠 |
| uuid | 接受 UUID 字符串 |
正则匹配
在 Flask 中,我们可以使用
具体使用方法如下:
from flask import Flask
import re

app = Flask(__name__)

@app.route('/user/')
def show_user(username):
    return f'User {username}'

@app.route('/post/')
def show_post(post_date):
    return f'Post from {post_date}'

if __name__ == '__main__':
    app.run(debug=True)
在上面的示例中,我们使用了 re 模块,使用正则表达式定义了两个动态路由。第一个路由匹配一个长度为 3 的小写字母字符串,第二个路由匹配一个 YYYY-MM-DD 格式的日期字符串。
需要注意的是,使用正则表达式定义的动态路由必须使用 re 转化器,并且正则表达式必须以 ^ 开头和以 $ 结尾。
总之,在 Flask 的动态路由中使用正则匹配需要引入 re 模块,并使用
多 URL 的路由
一个函数上可以设施多个 URL 路由规则:
@app.route('/')
@app.route('/hello')
@app.route('/hello/')

def hello(name=None):
    if name is None:
        name = 'World'
    return 'Hello %s' % name
这个例子接受三种 URL 规则,/ 和 /hello 都不带参数,函数参数 name 值将为空,页面显示”Hello World”;/hello/
HTTP 请求
在 Flask 中,路由可以定义多个 HTTP 请求方法。例如:
from flask import Flask

app = Flask(__name__)

@app.route('/login', methods=['GET', 'POST'])
def login():
    if request.method == 'POST':
        #处理 POST 请求
    else:
        #处理 GET 请求
在这个示例中,路由 /login 定义了两个 HTTP 请求方法:GET 和 POST。在视图函数中,我们使用 request.method 来判断当前请求的方法,从而执行不同的操作。
URL 构建
我们可以使用 url_for() 函数来构建动态 URL。例如:
from flask import Flask, url_for

app = Flask(__name__)

@app.route('/')
def index():
    return 'index'

@app.route('/login')
def login():
    return 'login'

@app.route('/user/<username>')
def profile(username):
    return f'{username}\'s profile'

with app.test_request_context():
    print(url_for('index'))  # 输出:/
    print(url_for('login'))  # 输出:/login
    print(url_for('profile', username='John Doe'))  # 输出:/user/John Doe
在这个示例中,我们定义了三个路由,使用 url_for() 函数来生成对应的 URL。
设置静态文件地址
在 Flask 中,我们可以使用 static_url_path 参数来设置静态文件的 URL 地址。默认情况下,Flask 将静态文件的 URL 地址设置为 /static。如果我们想要将静态文件的 URL 地址设置为其他值,可以在创建应用程序对象时,通过 static_url_path 参数进行设置。
例如:
from flask import Flask

app = Flask(__name__, static_url_path='/public')

if __name__ == '__main__':
    app.run(debug=True)
在上面的示例中,我们将静态文件的 URL 地址设置为 /public。这意味着,所有静态文件都将通过 /public 路径访问。
另外,我们还可以使用 static_folder 参数来指定静态文件的目录。例如:
from flask import Flask

app = Flask(__name__, static_url_path='/public', static_folder='static')

if __name__ == '__main__':
    app.run(debug=True)
在这个示例中,我们将静态文件的目录设置为 static,这意味着 Flask 将在项目根目录下寻找一个名为 static 的目录,并将其作为静态文件的目录。如果我们想要将静态文件存放在其他目录中,可以将 static_folder 参数设置为相应的路径。
在 Flask 中,我们可以使用 url_for() 函数来生成动态路由的 URL 地址。同样,我们也可以使用 url_for(‘static’, filename=’path/to/file’) 来获取静态文件的 URL 地址。
具体来说,url_for(‘static’, filename=’path/to/file’) 方法将根据应用程序对象中设置的 static_url_path 参数和 static_folder 参数来生成静态文件的 URL 地址。默认情况下,Flask 将静态文件的 URL 地址设置为 /static,静态文件的存放目录设置为 static。
例如:
from flask import Flask, url_for

app = Flask(__name__)

@app.route('/')
def index():
    css_url = url_for('static', filename='css/style.css')
    return f'<link rel="stylesheet" href="{css_url}">'

if __name__ == '__main__':
    app.run(debug=True)
在上面的示例中,我们使用 url_for(‘static’, filename=’css/style.css’) 方法获取了静态文件 css/style.css 的 URL 地址,并将其嵌入到 HTML 页面中。
重定向
在 Flask 中,我们可以使用 redirect() 函数来进行重定向。重定向是指将一个 URL 请求重定向到另一个 URL。
redirect() 函数接收一个参数 location,用于指定重定向的 URL。例如:
from flask import Flask, redirect, url_for

app = Flask(__name__)

@app.route('/')
def index():
    return redirect(url_for('login'))

@app.route('/login')
def login():
    return 'Login Page'
在上面的示例中,我们定义了两个路由,/ 和 /login。在 / 路由中,我们使用 redirect() 函数将请求重定向到 /login 路由。url_for(‘login’) 方法用于生成 /login 路由的 URL。
除了传递字符串类型的 location 参数,我们还可以传递其他类型的参数,用于生成 URL。例如:
from flask import Flask, redirect, url_for

app = Flask(__name__)

@app.route('/')
def index():
    return redirect(url_for('user', username='John Doe'))

@app.route('/user/<username>')
def user(username):
    return f'User {username}'
在上面的示例中,我们使用 url_for() 方法生成 /user/John Doe 路由的 URL,并将其传递给 redirect() 函数,实现了请求的重定向。
蓝图
在大型 Flask 应用程序中,我们可以使用蓝图来组织路由。蓝图允许我们将路由拆分为多个模块,使得应用程序的结构更加清晰。例如:
from flask import Blueprint, render_template

bp = Blueprint('blog', __name__, url_prefix='/blog')

@bp.route('/')
def index():
    posts = [...]  # 获取文章列表
    return render_template('blog/index.html', posts=posts)

@bp.route('/<int:post_id>')
def post(post_id):
    post = [...]  # 获取文章内容
    return render_template('blog/post.html', post=post)
在这个示例中,我们定义了一个名为 blog 的蓝图,并将其注册到应用程序中。我们使用 url_prefix 参数来指定这个蓝图的 URL 前缀。蓝图中的路由和基本路由很相似,但是它们的 URL 路径会加上一个前缀(/blog)。
在 Flask 中,蓝图是一种组织应用程序代码的方式,可以将不同的视图函数、模板、静态文件等资源组织在一个模块中。蓝图允许我们将应用程序拆分为多个模块,使得应用程序的结构更加清晰。
创建蓝图
要创建一个蓝图,我们可以使用 Flask 提供的 Blueprint 类。例如:
from flask import Blueprint

bp = Blueprint('blog', __name__)
在上面的示例中,我们创建了一个名为 blog 的蓝图,并将其保存在变量 bp 中。
注册蓝图
要将蓝图注册到应用程序中,我们可以使用 Flask 的 register_blueprint() 方法。例如:
from flask import Flask

app = Flask(__name__)

from .blog import bp as blog_bp
app.register_blueprint(blog_bp)
在上面的示例中,我们将名为blog的蓝图注册到应用程序中。
定义蓝图视图
在蓝图中,我们可以使用route()装饰器定义视图函数,其用法与应用程序路由的用法相同。例如:
from flask import Blueprint

bp = Blueprint('blog', __name__)

@bp.route('/')
def index():
    return 'index'

@bp.route('/post/<int:post_id>')
def post(post_id):
    return f'Post {post_id}'
在上面的示例中,我们定义了两个视图函数,一个是index(),一个是post()。这些视图函数只能在名为blog的蓝图中使用。
静态文件和模板
在蓝图中,我们也可以定义静态文件和模板文件。静态文件和模板文件的路径相对于蓝图所在的模块。例如:
from flask import Blueprint, render_template

bp = Blueprint('blog', __name__, static_folder='static', template_folder='templates')

@bp.route('/')
def index():
    return render_template('index.html')
在上面的示例中,我们将静态文件和模板文件的路径分别设置为static和templates,并在视图函数中使用render_template()方法渲染模板文件。
蓝图中间件
在蓝图中,我们也可以使用中间件。例如:
from flask import Blueprint, g

bp = Blueprint('blog', __name__)

@bp.before_request
def before_request():
    g.user = ...  # 获取用户信息

@bp.route('/')
def index():
    return 'Hello, {0}'.format(g.user['name'])
在上面的示例中,我们使用before_request()方法将一个中间件函数注册到蓝图中。这个中间件函数会在每个请求到达视图函数前被调用。在这个中间件函数中,我们设置了一个全局变量g.user,在视图函数中可以直接使用。
参考链接: