Werkzeug简介
Flask和Werkzeug之间的关系可以理解为Flask是建立在Werkzeug基础之上的一个Web框架。要了解它们之间的关系,我们需要先分别理解Flask和Werkzeug的角色和功能。
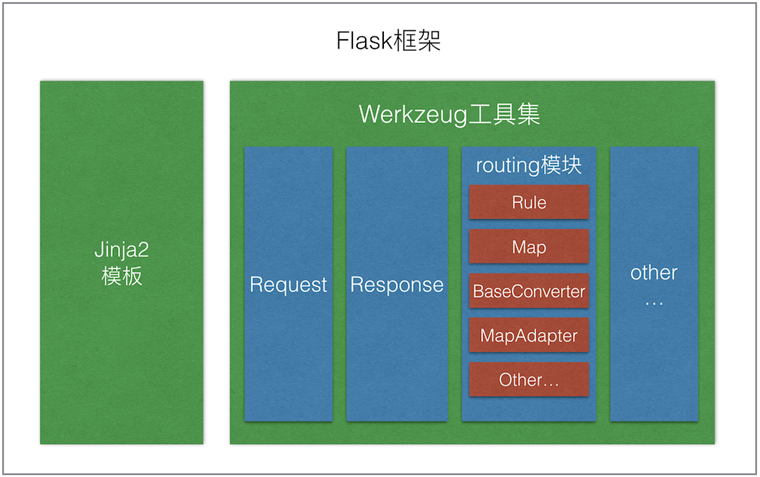
Werkzeug
Werkzeug是一个WSGI(Web Server Gateway Interface)工具库,它为Python Web应用提供了一系列实用的功能和组件。Werkzeug的主要职责包括:
- 处理HTTP请求和响应。
- 提供路由系统。
- 实现请求和响应对象。
- 提供实用的调试和错误处理工具。
总的来说,Werkzeug更像是一个底层的工具库,为构建Web应用提供了基础的构建块和工具。
Flask
Flask是一个轻量级的Web框架,它使用Werkzeug作为其WSGI层和路由系统的基础。Flask在Werkzeug提供的基础功能之上添加了:
- 更简洁易用的API。
- 模板渲染机制(使用Jinja2)。
- 支持插件和扩展。
- 更多的抽象层,使得开发Web应用更为方便。
可以这样理解,Werkzeug是提供基础Web功能的工具集,而Flask则是在这个工具集的基础上构建的,提供了更完整的Web框架体验。在Flask应用中,当处理路由、请求和响应等核心Web功能时,实际上是在使用Werkzeug的功能。换句话说,Werkzeug为Flask提供了底层的Web功能支持,而Flask则在此之上提供了更高层次的抽象和便利。
通过这种关系,Flask成为了一个易于上手但功能强大的Web框架,适合于快速开发小到中型的Web应用,同时保持足够的灵活性和可扩展性。
为了更加深入的了解Flask和Werkzeug的关系,我们带来使用Werkzeug搭建一个应用来学习。
Hello World App
准备工作
创建一个新的项目
$ mkdir werkzeug_movie_app
$ cd werkzeug_movie_app
$ python3 -m venv venv
$ source venv/bin/activate
(venv)$
安装Werkzeug, Jinja, 和redis-py:
(venv)$ pip install Werkzeug Jinja2 redis
(venv)$ pip freeze > requirements.txt
Redis 会被用来存储电影数据。
应用开发
Werkzeug是用于构建WSGI兼容Web应用程序的库集合。它不提供高级类(如Flask)来构建完整的Web应用程序。相反,您需要自己从Werkzeug的库创建应用程序。
在项目的顶级文件夹中创建一个新的app.py文件:
from werkzeug.wrappers import Request, Response


class MovieApp(object):
    """Implements a WSGI application for managing your favorite movies."""
    def __init__(self):
        pass

    def dispatch_request(self, request):
        """Dispatches the request."""
        return Response('Hello World!')

    def wsgi_app(self, environ, start_response):
        """WSGI application that processes requests and returns responses."""
        request = Request(environ)
        response = self.dispatch_request(request)
        return response(environ, start_response)

    def __call__(self, environ, start_response):
        """The WSGI server calls this method as the WSGI application."""
        return self.wsgi_app(environ, start_response)


def create_app():
    """Application factory function that returns an instance of MovieApp."""
    app = MovieApp()
    return app
MovieApp类实现一个与WSGI兼容的Web应用程序,该应用程序处理来自不同用户的请求并生成返回给用户的响应。以下是此类与WSGI服务器交互的流程:
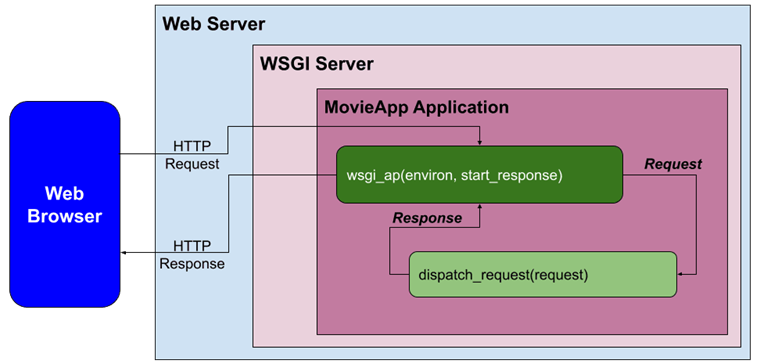
收到请求后,系统会在wsgi_app():中对其进行处理:
def wsgi_app(self, environ, start_response):
    """WSGI application that processes requests and returns responses."""
    request = Request(environ)
    response = self.dispatch_request(request)
    return response(environ, start_response)
环境(environ)在Request类中自动处理,以创建request对象。然后在dispatch_request()中处理request。对于此初始示例,dispatch_request()返回”Hello World!”响应。然后从wsgi_app()返回响应。
与Flask的比较:MovieApp是Flask类的简化版本。在Flask类中,wsgi_app()是与WSGI服务器交互的实际WSGI应用程序。此外,dispatch_request()和full_dispatch_request()用于执行请求调度,该调度将URL与适用的视图函数匹配并处理异常。
部署服务
将以下代码添加到app.py底部以运行Werkzeug开发服务器:
if __name__ == '__main__':
    # Run the Werkzeug development server to serve the WSGI application (MovieApp)
    from werkzeug.serving import run_simple
    app = create_app()
    run_simple('127.0.0.1', 5000, app, use_debugger=True, use_reloader=True)
运行程序:
(venv)$ python app.py
浏览http://localhost:5000可以查看到”Hello World!”消息。
存储静态文件的中间件
在Web应用程序中,中间件是一个软件组件,可以添加到请求/响应处理管道中以执行特定功能。
Web服务器/应用程序要执行的一项重要功能是提供静态文件(CSS、JavaScript和图像文件)。Werkzeug为此功能提供了一个称为 SharedDataMiddleware 的中间件。
SharedDataMiddleware 非常适合使用 Werkzeug 开发服务器来提供静态文件。
要利用 SharedDataMiddleware,新建一个”static”文件夹,并且在其下再创建”css”和”img”文件夹:
├── app.py
├── requirements.txt
└── static
    ├── css
    └── img
在”static/img”文件夹中,添加Flask的logo。将其另存为flask.png。
接下里,我们应用工厂方法:
import os

from werkzeug.middleware.shared_data import SharedDataMiddleware
from werkzeug.wrappers import Request, Response

def create_app():
    """Application factory function that returns an instance of MovieApp."""
    app = MovieApp()
    app.wsgi_app = SharedDataMiddleware(app.wsgi_app, {
        '/static': os.path.join(os.path.dirname(__file__), 'static')
    })
    return app
现在,当Werkzeug应用程序处理请求时,它将首先被路由到 app SharedDataMiddleware() 以确定是否已请求静态文件:
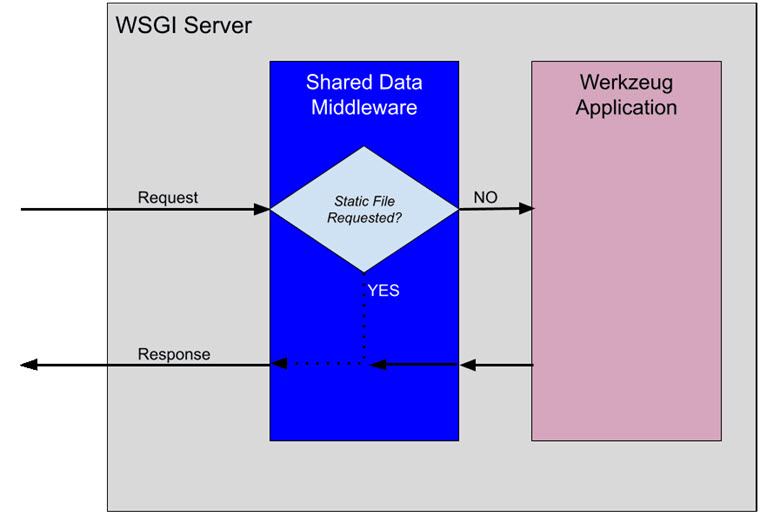
如果请求静态文件,SharedDataMiddleware wsgi_app() 将使用静态文件生成响应。否则,请求将向下传递到Werkzeug应用程序进行处理。
若要查看 SharedDataMiddleware wsgi_app() 实际操作,请运行服务器并打开 http://localhost:5000/static/img/flask.png 查看Flask Logo。
有关Werkzeug提供的中间件解决方案的完整列表,请查看中间件文档。
与Flask的比较:Flask不使用 SharedDataMiddleware。它采用不同的方法来提供静态文件。默认情况下,如果存在静态文件夹,Flask会自动添加新的URL规则来提供静态文件。
为了说明此概念,请在Flask应用程序的项目中运行 flask routes:
(venv)$ flask routes

Endpoint    Methods    Rule
-----------------------------------------
index       GET        /
static      GET        /static/<path:filename>
模板系统
正如在Flask项目中通常所做的那样,我们将使用Jinja作为应用的模板引擎。
首先新建一个”templates”文件夹:
├── app.py
├── requirements.txt
├── static
│   ├── css
│   └── img
│       └── flask.png
└── templates
为了利用Jinja,请扩展该 MovieApp 类的构造函数:
from jinja2 import Environment, FileSystemLoader

def __init__(self):
    """Initializes the Jinja templating engine to render from the 'templates' folder."""
    template_path = os.path.join(os.path.dirname(__file__), 'templates')
    self.jinja_env = Environment(loader=FileSystemLoader(template_path),
                                autoescape=True)
与Flask的比较:Flask也是利用jinja的Environment 来创建模板引擎。
在 MovieApp 类中,添加一个新方法:render_template()
def render_template(self, template_name, **context):
    """Renders the specified template file using the Jinja templating engine."""
    template = self.jinja_env.get_template(template_name)
    return Response(template.render(context), mimetype='text/html')
此方法将 template_name 和变量传递给模板引擎(**context)。然后,它使用Jinja的 render() 方法生成一个 Response。
与Flask比较:render_template() 是不是非常的熟悉?他是Flask中最常用的功能之一。
若要查看 render_template() 实际操作,更新 dispatch_request() 来渲染模板:
def dispatch_request(self, request):
    """Dispatches the request."""
    return self.render_template('base.html')
针对此应用的所有请求将渲染 templates/base.html 模板:
<!DOCTYPE html>
<html lang="en">
<head>
    <meta charset="UTF-8">
    <title>Werkzeug MovieApp</title>

    <!-- CSS file for styling the application -->
    <link rel="stylesheet" href="/static/css/style.css" type="text/css">
</head>
<body>
    <h1>Werkzeug MovieApp</h1>
    {% block body %}
    {% endblock %}
</body>
</html>
URL路由
路由主要将将URL与视图函数做匹配,Werkzeug提供了一个 Map 类来处理。让我们一起来看下是怎么处理的:
from werkzeug.routing import Map, Rule

def __init__(self):
    """Initializes the Jinja templating engine to render from the 'templates' folder."""
    template_path = os.path.join(os.path.dirname(__file__), 'templates')
    self.jinja_env = Environment(loader=FileSystemLoader(template_path),
    autoescape=True)
    self.url_map = Map([
        Rule('/', endpoint='index'),
        Rule('/movies', endpoint='movies'),
    ])
每个Rule对象都定义了一个URL和视图函数,如果匹配到URL就调用此函数。例如访问主页(‘/’)时,index函数就会被调用。
与Flask比较:Flask使用的是@route装饰器,其原理就是使用装饰器更新url_map,与上面手动url_map的操作是一样的。
为了应用URL映射,需要更新dispatch_request():
from werkzeug.exceptions import HTTPException

def dispatch_request(self, request):
    """Dispatches the request."""
    adapter = self.url_map.bind_to_environ(request.environ)
    try:
        endpoint, values = adapter.match()
        return getattr(self, endpoint)(request, **values)
    except HTTPException as e:
        return e
现在,当请求进入dispatch_request()时,将进行匹配操作。如果请求的URL包含在url_map中,则将调用适用的视图函数。如果在url_map中找不到该URL,则会引发异常。
我们在url_map中指定了两个视图函数,因此现在让我们在MovieApp类中创建它们:
def index(self, request):
    return self.render_template('base.html')

def movies(self, request):
    return self.render_template('movies.html')
templates/base.html是在上一节中已经创建的,现在需要创建templates/movies.html:
{% extends "base.html" %}

{% block body %}
<div class="table-container">
<table>
<!--TableHeader-->
<thead>
<tr>
<th>Index</th>
<th>Movie Title</th>
</tr>
</thead>

<!--TableElements(Rows)-->
<tbody>
<tr>
<td>1</td>
<td>Knives Out</td>
</tr>
<tr>
<td>2</td>
<td>Pirates of the Caribbean</td>
</tr>
<tr>
<td>3</td>
<td>Inside Man</td>
</tr>
</tbody>
</table>
</div>
{% endblock %}
此模板文件利用模板继承将base.html用作父模板。它生成一个包含三部电影的表。
完成后再打开浏览器查看最终的结果。
异常处理
尝试访问http://localhost:5000/movies2,你会看到一个默认错误页面,原因是无法在url_map中找到对应的视图。
我们来通过扩展dispatch_request()创建一个自定义的错误页面:
from werkzeug.exceptions import HTTPException, NotFound

def dispatch_request(self, request):
    """Dispatches the request."""
    adapter = self.url_map.bind_to_environ(request.environ)
    try:
        endpoint, values = adapter.match()
        return getattr(self, endpoint)(request, **values)
    except NotFound:
        return self.error_404()
    except HTTPException as e:
        return e
现在如果URL在url_map中没有被匹配到,将会调用error_404()。我们在MovieApp类下面创建一个新的方法:
def error_404(self):
    response = self.render_template("404.html")
    response.status_code = 404
    return response
并且创建一个对应的模板templates/404.html:
% extends "base.html" %}

{% block body %}
<div class="error-description">
<h2>Page Not Found (404)</h2>
<h4>What you were looking for is just not there!</h4>
<h4><a href="/">Werkzeug Movie App</a></h4>
</div>
{% endblock %}
错误页面就设置完成了。
与Flask比较:当full_dispatch_request()在Flask类中检测到异常时,将在handle_user_exceptions()中正常处理。Flask还允许所有HTTP错误代码的自定义错误页面。
请求处理
在本节中,我们将向应用程序添加一个表单,以允许用户输入他们喜欢的电影。
如前所述,我们将使用Redis来持久化电影,因为它的读/写速度快且易于设置。
启动并运行Redis的最快方法是使用Docker:
$ docker run --name some-redis -d -p 6379:6379 redis
要检查Redis容器是否正在运行,请执行以下操作:
$ docker ps
要停止正在运行的Redis容器,请执行以下操作:
$ docker stop some-redis # Use name of Docker container
如果您不是Docker用户,请查看以下资源:
为了利用 Redis,首先更新 MovieApp 构造函数以创建一个 StrictRedis 实例:
from redis import StrictRedis

def __init__(self, config):  # Updated!!
    """Initializes the Jinja templating engine to render from the 'templates' folder,
    defines the mapping of URLs to view methods, and initializes the Redis interface."""
    template_path = os.path.join(os.path.dirname(__file__), 'templates')
    self.jinja_env = Environment(loader=FileSystemLoader(template_path),
    autoescape=True)
    self.url_map = Map([
        Rule('/', endpoint='index'),
        Rule('/movies', endpoint='movies'),
    ])
    self.redis = StrictRedis(config['redis_host'], config['redis_port'],
    decode_responses=True)  # New!!
此外,构造函数还有一个附加参数(config),用于创建 StrictRedis 的实例。
传递给构造函数的配置参数需要在应用程序工厂函数中指定:
def create_app():
    """Application factory function that returns an instance of MovieApp."""
    app = MovieApp({'redis_host': 'localhost', 'redis_port': 6379})
    app.wsgi_app = SharedDataMiddleware(app.wsgi_app, {
        '/static': os.path.join(os.path.dirname(__file__), 'static')
    })
    return app
表单处理
为了让用户在 Redis 存储中添加电影,我们需要在 url_map 中新增一个视图函数:
def __init__(self, config):
    """Initializes the Jinja templating engine to render from the 'templates' folder,
    defines the mapping of URLs to view methods, and initializes the Redis interface."""

    ...

    self.url_map = Map([
        Rule('/', endpoint='index', methods=['GET']),
        Rule('/movies', endpoint='movies', methods=['GET']),
        Rule('/add', endpoint='add_movie', methods=['GET', 'POST']),  # !!!
    ])

    ...
在 url_map 的 Rule 规则中我们还扩展了 HTTP 方法。如果 ‘/add’ 被 GET 或 POST 请求就会调用 add_movie() 视图函数。
接下来我们需要再 MovieApp 类中增加 add_movie() 视图:
from werkzeug.utils import redirect

def add_movie(self, request):
    """Adds a movie to the list of favorite movies."""
    if request.method == 'POST':
        movie_title = request.form['title']
        self.redis.lpush('movies', movie_title)
        return redirect('/movies')
    return self.render_template('add_movie.html')
如果是 GET 请求,则 add_movie() 渲染 templates/add_movie.html 文件,如果是 POST 请求则将数据存储到 Redis 中,并且重定向网址到电影列表页。
创建 templates/add_movie.html 模板文件:
{% extends "base.html" %}

{% block body %}
<div class="form-container">
<form method="post">
<div class="field">
<label for="movieTitle">Movie Title:</label>
<input type="text" id="movieTitle" name="title"/>
</div>
<div class="field">
<button type="submit">Submit</button>
</div>
</form>
</div>
{% endblock %}
显示电影
由于我们现在将电影存储在 Redis 中,因此需要更新 movie() 视图函数以从 Redis 中的列表中读取电影列表:
def movies(self, request):
    """Displays the list of favorite movies."""
    movies = self.redis.lrange('movies', 0, -1)
    return self.render_template('movies.html', movies=movies)
电影列表的信息会被传递到 templates/movies.html 模板文件,我们需要使用循环来读取这些信息:
{% extends "base.html" %}

{% block body %}
<div class="table-container">
<table>
<!-- Table Header -->
<thead>
<tr>
<th>Index</th>
<th>Movie Title</th>
</tr>
</thead>

<!-- Table Elements (Rows) -->
<tbody>
{% for movie in movies %}
<tr>
<td>{{ loop.index }}</td>
<td>{{ movie }}</td>
</tr>
{% endfor %}
</tbody>
</table>
</div>
{% endblock %}
至此,整个 App 基本上已经开发完毕。
为什么不使用 Werkzeug 替换掉 Flask?
Werkzeug 提供了 Flask 中的许多关键功能,但 Flask 增加了许多强大的功能,例如:
- Sessions
- 应用程序和请求上下文
- 蓝图
- Request callback functions
- Utilities:
- @route 装饰器
- url_for() 函数
- CLI 命令
- 异常处理
- Flask shell
- Logging
- Signals
- Extensions
Test client
与任何Web框架一样,不要重新发明轮子!Flask是基于其丰富的功能集和大量扩展的Web开发选择(与Werkzeug相比)。
本文通过展示如何使用Werkzeug构建一个简单的Web应用程序,概述了Flask的关键组件之一Werkzeug。虽然了解底层库在Flask中的工作方式很重要,但使用Werkzeug创建Web应用程序的复杂性应该说明使用Flask开发Web应用程序是多么容易!
参考链接: