Streamlit简介
Streamlit是一个基于Python的可视化工具,和其他可视化工具不同的是,它生成的是一个可交互的站点(页面)。但同时它又不是我们常接触的类似Django、Flask这样的WEB框架。当前使用下来的感受:
缺点:
- 自带服务器,且需要从命令行启动服务方能查看页面,不能通过直接运行Python代码的方式启动应用。即不能集成到其他系统及框架中
- 当前只支持单页面,不能通过URL传参等方式生成多页面。Github有人提了Issues,但是目前还没支持,部分人给了一些临时的Hack
- 目前不支持登录验证,且由于自带服务器的原因,很难集成其他第三方的登录验证等,不能做很好的数据权限控制
优点:
- 无需编写任何HTML、CSS或JS代码就可以生成界面不错的页面
整体评价:优势明显,定位于只熟悉Python代码的算法人员。虽然目前的功能比较简陋,问题较多,但随着不断的开发,相信功能也会也来越强大。
Streamlit 带来的改变
原先的数据展示页面开发流程:
- 在Jupyter中开发演示
- 将Python代码复制到文件
- 编写Flask应用,包括考虑HTTP请求、HTML代码、JS和回调等
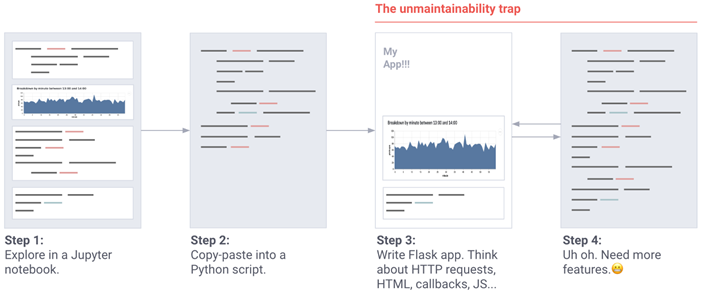
而当展示页面非常重要时,通常的流程是这样的:
- 收集用户需求
- 定义展示框架与原型
- 使用HTML、CSS、Python、React、Javascript等进行编码
- 一个月以后才能看到最终的页面

Streamlit的流程:
- 稍微改下Python代码即可生成展示界面
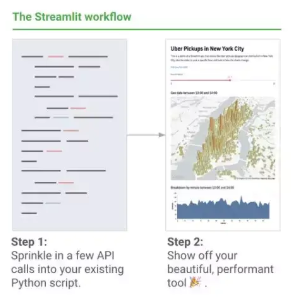
而能够快速生成应用,主要原因是Streamlit兼容以下Python库或框架:
- 数据处理:Numpy、Pandas
- 机器学习框架或库:Scilit-Learn、TensorFlow、Keras、PyTorch
- 数据可视化工具:matplotlib、seaborn、plotly、boken、Altair、GL、Vega-Lite
- 文本处理:Markdown、LaTeX
Streamlit使用指南
上面介绍的感觉有些摸不着头脑,接下来直接用代码来演示。
常用命令
# 启动运行APP
streamlit run your_script.py

# 显示配置文档
streamlit config show

# 清除缓存
streamlit cache clear
显示文本
import streamlit as st

st.title("标题")
st.header("My Website")
st.subheader("Data Analytics")
st.text("Simple text")
st.write("Hello World!")
st.markdown('Streamlit is **_really_ cool**.')
st.latex('E=MC^2')
st.success('Success!')
st.warning('Warning!')
st.error('Error!')
st.code("""
class MyClass:
    def __init__(self):
        super(MyClass, self).__init__()
""")

st.json({
    "pagination": {
        "total": 100,
        "per_page": 20,
        "page": 1,
    },
    "items": [
        {
            "id": 1,
            "name": "admin",
            "email": "admin@test.com",
            "is_superuser": True
        }
    ]
})
展现内容如下:
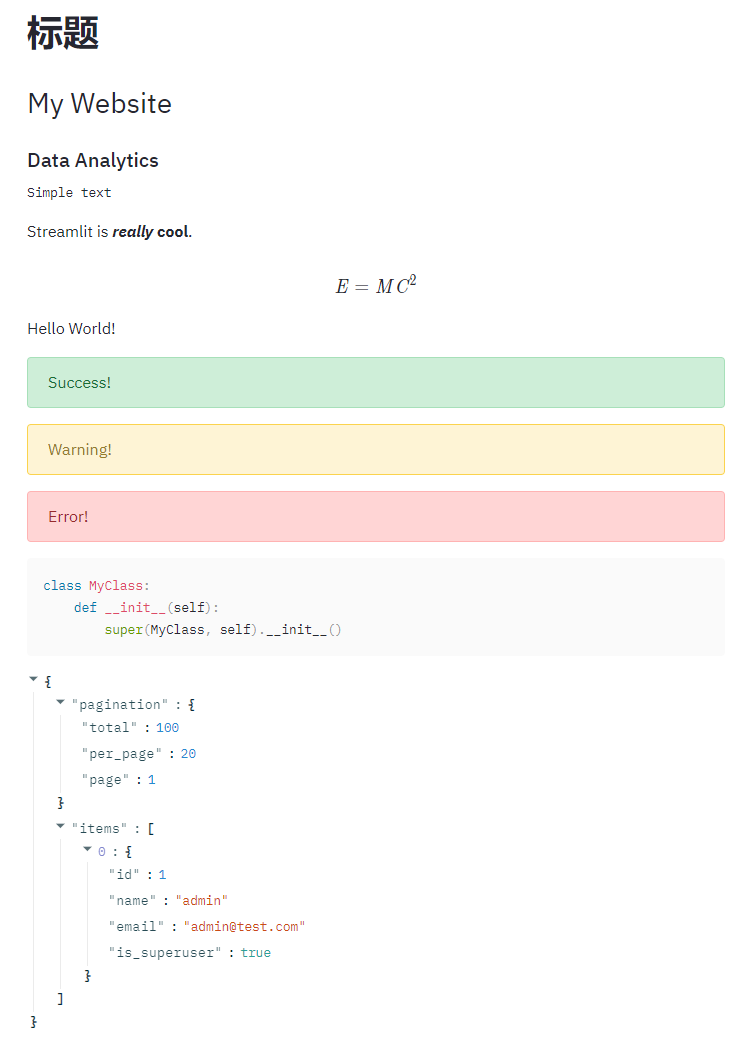
从上面可以看到,Streamlit可以非常方便的相似不同层级的title(目前只支持3种,类似H1~H3),同时支持文本、LaTeX、Markdown、Code和JSON、Emoji的输出。也支持信息的反馈的支持(成功、警告、错误)。
另外st.write()支持各种类型的数据:
- write(string):显示字符串或Markdown字符串,同时支持LaTeX、emojishortcodes
- write(data_frame): 显示DataFrame表格
- write(error): 显示错误信息
- write(func): 显示function信息
- write(module): 显示module的信息
- write(dict): Displays dict in an interactive widget.
- write(obj): 打印字符串对象
- write(mpl_fig): 显示Matplotlib图片
- write(altair): 显示Altair图表
- write(keras): 显示Keras模型
- write(graphviz): 显示Graphviz图片
- write(plotly_fig): 显示Plotly图片
- write(bokeh_fig): 显示Bokeh图片
- write(sympy_expr): 使用LaTeX显示SymPy语法
显示数据
import streamlit as st
import pandas as pd
import numpy as np

df = pd.DataFrame(np.random.randn(10, 20), columns=('col%d' % i for i in range(20)))
st.dataframe(df)
st.table(df)
显示内容:
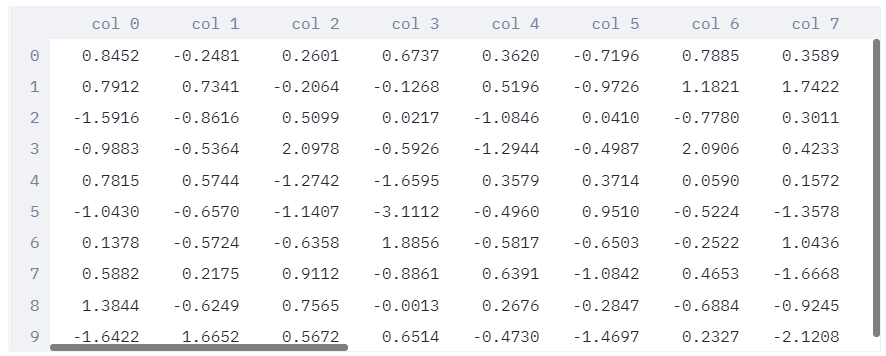
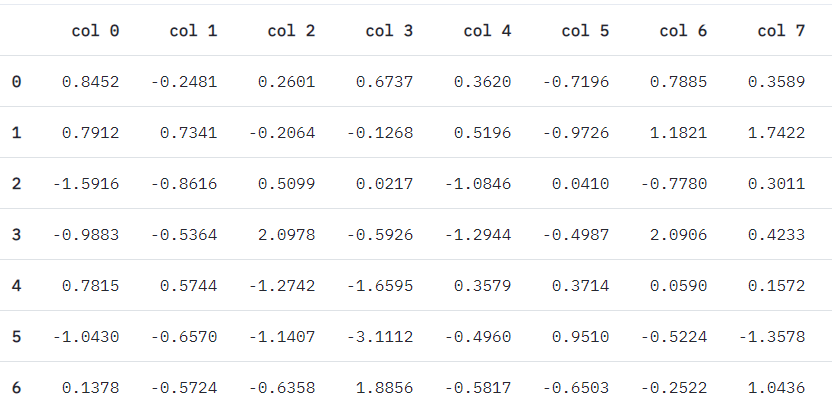
可以看到,使用st.dataframe(df)相比st.table(df)界面要好看些。
显示图表
import streamlit as st
import pandas as pd
import numpy as np
import matplotlib.pyplot as plt

df = pd.DataFrame(np.random.randn(20, 3), columns=['a', 'b', 'c'])
st.line_chart(df)
st.area_chart(df)
st.bar_chart(df)

arr = np.random.normal(1, 1, size=100)
plt.hist(arr, bins=20)
st.pyplot()

df_location = pd.DataFrame(np.random.randn(1000, 2)/[50, 50] + [37.76, -122.4], columns=['lat', 'lon'])
st.map(df_location)

# st.altair_chart()
# st.vega_lite_chart()
# st.plotly_chart()
# st.bokeh_chart()
# st.pydeck_chart()
# st.deck_gl_chart()
# st.graphviz_chart()
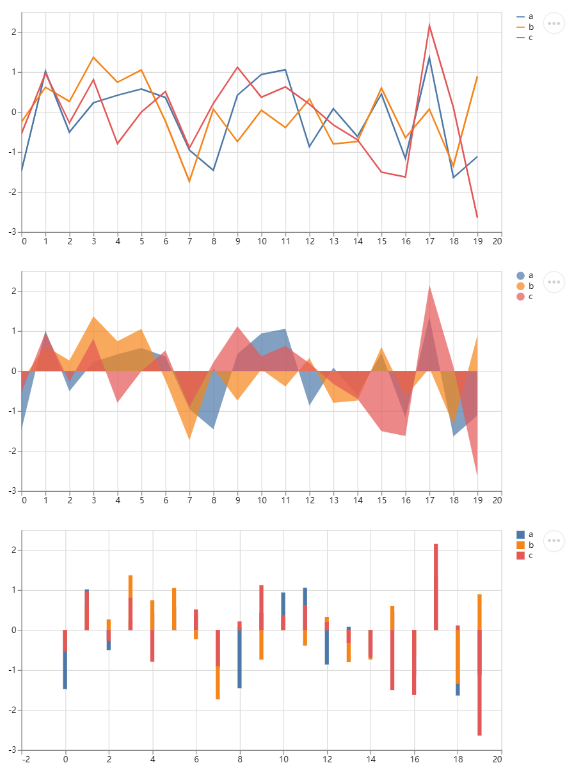
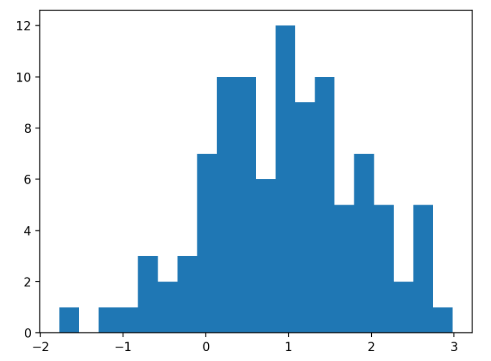
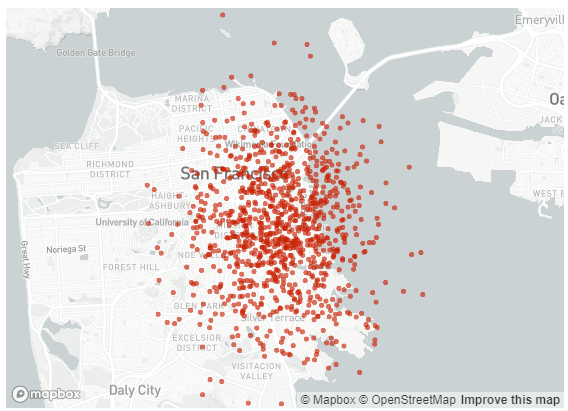
可以看到这里支持目前市面上的各种图表的Python库。
显示媒体
这里的媒体包括:图片、音频、视频。
import streamlit as st

st.image()
st.audio()
st.video()
这里不详细介绍,具体可以见官方文档
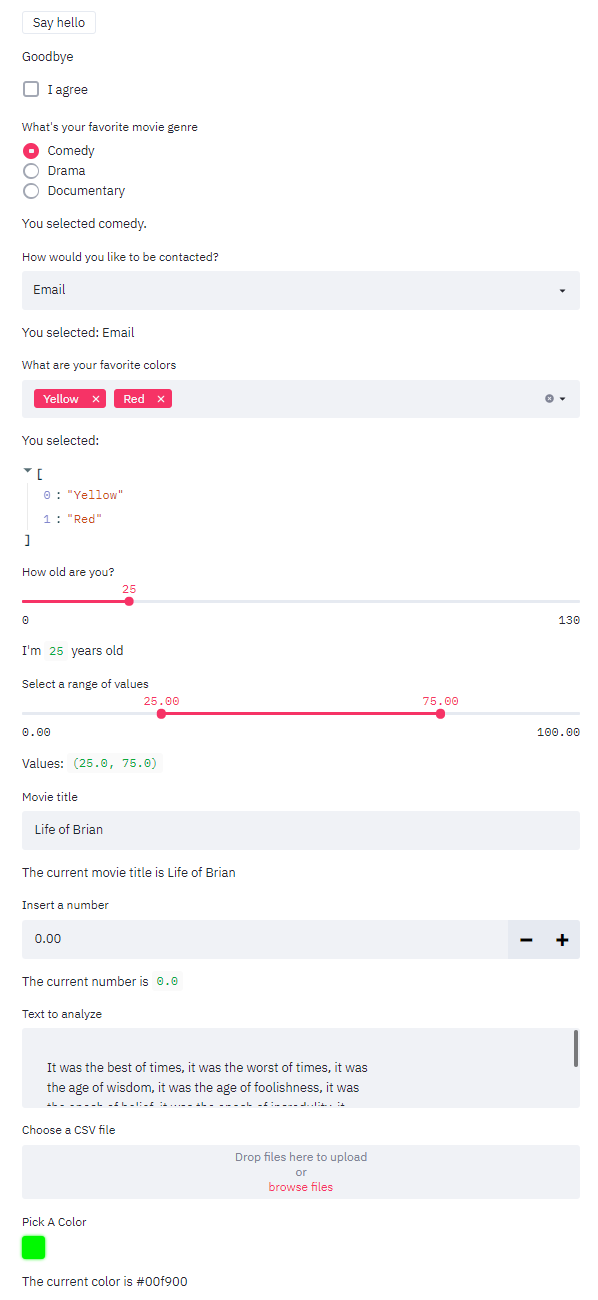
交互组件
import streamlit as st
import pandas as pd

# 按钮
if st.button('Say hello'):
    st.write('Why hello there')
else:
    st.write('Goodbye')

# 勾选项
agree = st.checkbox('I agree')
if agree:
    st.write('Great!')

# 单选项
genre = st.radio("What's your favorite movie genre", ('Comedy', 'Drama', 'Documentary'))
if genre == 'Comedy':
    st.write('You selected comedy.')
else:
    st.write("You didn't select comedy.")

# 下拉框
option = st.selectbox('How would you like to be contacted?', ('Email', 'Home phone', 'Mobile phone'))
st.write('You selected:', option)

# 多选框
options = st.multiselect('What are your favorite colors', ['Green', 'Yellow', 'Red', 'Blue'], ['Yellow', 'Red'])
st.write('You selected:', options)

# 滑块(单)
age = st.slider('How old are you?', 0, 130, 25)
st.write("I'm", age, 'years old')

# 滑块(双)
values = st.slider('Select a range of values', 0.0, 100.0, (25.0, 75.0))
st.write('Values:', values)

# 输入框
title = st.text_input('Movie title', 'Life of Brian')
st.write('The current movie title is', title)

# 数字选择项
number = st.number_input('Insert a number')
st.write('The current number is', number)

# 多行输入框
txt = st.text_area('Text to analyze', '''
It was the best of times, it was the worst of times, it was
the age of wisdom, it was the age of foolishness, it was
the epoch of belief, it was the epoch of incredulity, it
was the season of Light, it was the season of Darkness, it
was the spring of hope, it was the winter of despair, (...)
''')

# 上传文件
uploaded_file = st.file_uploader("Choose a CSV file", type="csv")
if uploaded_file is not None:
    data = pd.read_csv(uploaded_file)
    st.write(data)

# 颜色选择
color = st.beta_color_picker('Pick A Color', '#00f900')
st.write('The current color is', color)
侧边栏
import streamlit as st

option = st.sidebar.write("Hello World!")
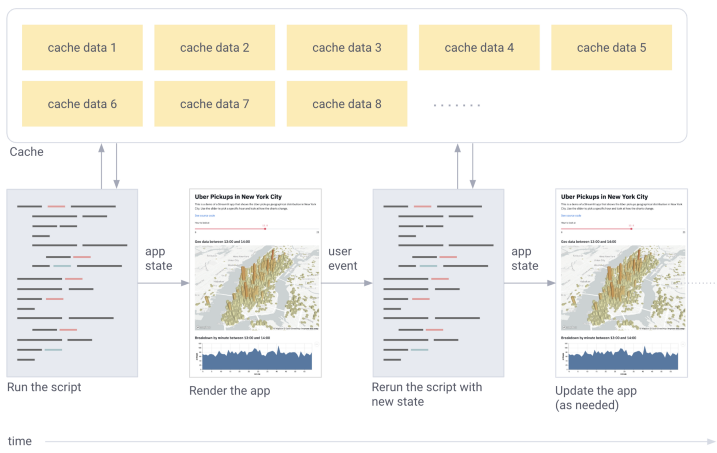
缓存机制
Streamlit遵循由上至下的运行顺序,所以每次代码中有进行任何更改,都会重新开始运行一遍,会十分耗时。@st.cache会对封装起来的函数进行缓存,避免二次加载。如果函数中的代码发生变动,cache会重新加载一遍并缓存起来。假如将代码还原到上一次版本,由于先前的数据已经缓存起来了,所以不会进行二次加载。
@st.cache  # This function will be cached
def my_slow_function(arg1, arg2):
    # Do something really slow in here!
    return the_output
当使用@st.cache装饰器标记一个函数时,这将告诉steamlit在此函数被调用的时候应当检查以下事情:
- 缓存函数的输入参数
- 缓存函数使用的外部变量的值
- 缓存函数主体
- 缓存函数中调用到的函数的主题
若streamlit是初次看到这四个部分的确切值,组合方法和顺序,那么streamlit将执行这个函数并将结果保存在本地缓存中。下次当缓存函数被调用的时候,若这些部分没有变化,streamlit将直接返回之前缓存中的结果作为输出。
举个例子,当函数expensive_computation(a, b),被@st.cache装饰时,并以a=2和b=21执行,Streamlit会进行以下操作:
- 计算缓存的 key
- 若 key 可以在缓存中找到,则:
- 提取出以前的缓存元组(缓存输出和缓存输出的 hash)
- 执行输出突变检查, 计算输出的新哈希并将其与存储的 output_hash 进行比较。
- 若两 hash 不同,显示告警 CachedObjectMutated。(Note: 设置 allow_output_mutation=True 可以禁用这步)。
- 若输入的 hash 在缓存中找不到:
- 执行缓存函数(i.e. output=expensive_computation(2, 21))
- 根据函数的 output 计算 output_hash
- 将 key→(output, output_hash)存入缓存
- 返回输出
如果遇到错误,则会引发异常。.如果在对键或输出进行哈希处理时发生错误,则会引发 UnhashableTypeError 错误。
如上所述,Streamlit 的缓存功能依赖于散列来计算缓存对象的键,并检测缓存结果中的意外变化。为了增强表达能力,Streamlit 允许您使用 hash_funcs 参数覆盖此哈希过程。比如函数打开一个文件,默认情况下,它的 hash 是属性 filename 的 hash。只要文件名不变,哈希值将保持不变。可以使用 @st.cache 装饰器的 hash_funcs 参数:
import io

def hash_io(input_io):
    return (input_io.getvalue(), input_io.tell())


@st.cache(hash_funcs={io.BytesIO: hash_io, io.StringIO: hash_io})
def load_data(file_data):
    try:
        return pd.read_csv(file_data)
    except:
        return pd.read_excel(file_data)
Streamlit 使用 Hack
掩藏底部链接
hide_st_style = "<style>#MainMenu{visibility:hidden;}footer{visibility:hidden;}</style>"
st.markdown(hide_st_style, unsafe_allow_html=True)
支持使用 folium 展示地图
st.markdown(map._repr_html_(), unsafe_allow_html=True)
如下报错:(地图不能显示)
Make this Notebook Trusted to load map: File->Trust Notebook
解决方案:pip install branca==3.1.0支持通过 URL 获取参数
备注:仅在 0.58.0 版本测试通过,新版本应该已经支持获取 URL 参数了。
1、找到 tornado 的安装路径
import tornado
print(tornado.__file__)
2、修改 tornado 下的 routing.py 文件
class _RoutingDelegate(httputil.HTTPMessageDelegate):
    def __init__(self, router, server_conn, request_conn):
        self.server_conn = server_conn
        self.request_conn = request_conn
        self.delegate = None
        self.router = router # type: Router

    def headers_received(self, start_line, headers):
        request = httputil.HTTPServerRequest(
            connection=self.request_conn,
            server_connection=self.server_conn,
            start_line=start_line, headers=headers)

        # 添加代码
        if request.query != '':
            self.request_conn.params.urlpara = dict()
            psl = request.query.split('&')
            for ps in psl:
                pl = ps.split('=')
                self.request_conn.params.urlpara[pl[0]] = pl[1]
        ## 添加代码终止

        self.delegate = self.router.find_handler(request)
        if self.delegate is None:
            app_log.debug("Delegate for %s %s request not found",
                start_line.method, start_line.path)
            self.delegate = _DefaultMessageDelegate(self.request_conn)

        return self.delegate.headers_received(start_line, headers)
3、重启应用后进行测试:https://127.0.0.1:8501/?mypara1=99
import streamlit as st
from streamlit.server.Server import Server

sessions = Server.get_current()._session_info_by_id
session_id_key = list(sessions.keys())[0]
session = sessions[session_id_key]
urlPara = session.ws.request.connection.params.urlpara

st.write("URL PARAM: " + str(urlPara))支持
DataFrame 支持样式定义问题
df.style.format({'col1': '{:.0f}', 'col2': '{:,.2%}'})
通过以上方法可以控制 dataframe 中字段的显示精度问题或按百分比显示等,但往往会报错,原因是 pandas 1.1.0 升级后导致的。
解决方案是退回老版本:pip install pandas==1.0.0支持不同 URL 类型的不同页面共存
上面 URL 获取参数存在一定的 Bug,即当访问一个带参数的 URL 过后,再刷新其他的页面,以前带的参数会还保存下来,解决方式是部署不同页面,不同页面使用不同的端口。然后再通过 Nginx 进行 URL 映射:
server {
listen 80;
server_name streamlit.domain.com;
proxy_http_version 1.1;
proxy_set_header X-Forwarded-For $proxy_add_x_forwarded_for;
proxy_set_header Host $host;

# streamlit specific:
proxy_set_header Upgrade $http_upgrade;
proxy_set_header Connection "upgrade";
proxy_read_timeout 86400;

location /app1/ {
proxy_pass http://172.17.0.2:8501/;
}
location /app2/ {
proxy_pass http://172.17.0.2:8502/;
}
location / {
proxy_pass http://172.17.0.2:8503/;
}
}
支持账号密码登录
Stremlit本身不带登录验证,对于一些数据型的应用可能需要权限才能查看,一种简单的方法是每个应用最外层加上输入框,在用户输入的字符不等于代码中支付时,不显示内容。另外一种方案是,可以使用nginx的auth:
location / {
auth_basic "登录认证";
auth_basic_user_file /etc/nginx/conf/pass_file;
autoindex on;
proxy_pass http://172.17.0.2:8501/;
}
Streamlit的替代品
Streamlit最大的竞争敌手主要是Plotly Dash,相对Streamlit目前的功能更加完善,但是学习曲线相比Streamlit会稍微高一些。但从整体上对Streamlit的前景会更看好些。主要是Plotly Dash把其主要限制在了Plot.ly。两者在Github上的表现如下:
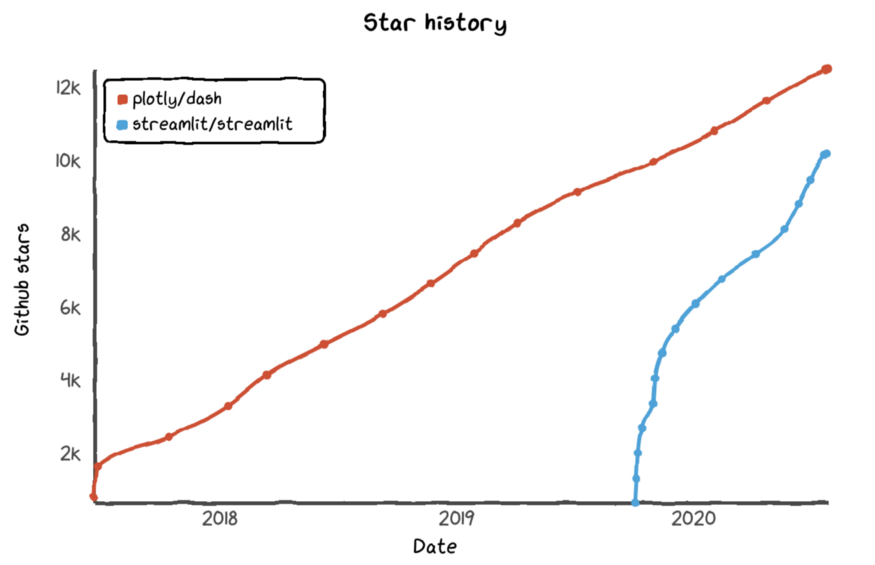
关于Plotly Dash的更多资料,期待下次有时间可以做更多的系统化整理。
参考资料: