Microbit的Python API主要基于micro:bit库,该库提供了丰富的硬件接口和功能。为了更加全面的学习,我们以官方Python Editor作为参考。

核心API学习
显示模块 (display)
Micro:bit 的显示模块是其最核心的功能之一,它控制着板载的 5×5 LED 矩阵。这个模块提供了丰富的功能,从简单的文本显示到复杂的动画效果。
基本显示功能
文本显示
from microbit import *

# 滚动显示文本(默认从右向左)
display.scroll("Hello Micro:bit!")

# 带参数的滚动显示
display.scroll("Python", delay=100, wait=False, loop=True, monospace=False)
- delay: 滚动速度(毫秒),值越小越快(默认150)
- wait: 是否阻塞程序(默认True,显示完才执行后续代码)
- loop: 是否循环显示(默认False)
- monospace: 是否使用等宽字体(默认False)
显示数字
# 直接显示整数
display.show(42)

# 显示浮点数(自动四舍五入)
display.show(3.14159)  # 显示3

# 显示字符
display.show('A')
清除显示
display.clear() # 关闭所有LED
图像显示系统
内置图像
MicroPython 预置了数十种常用图像:
# 显示内置图像
display.show(Image.HEART)
display.show(Image.HAPPY)
display.show(Image.SAD)
display.show(Image.ARROW_N)  # 北箭头
其他内置图像:Images — BBC micro:bit MicroPython 1.1.1 documentation
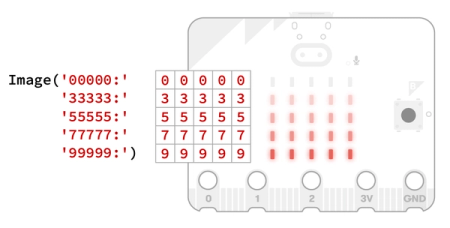
自定义图像
您可以制作自己的图像。 每个 LED 的亮度由介于 0(关闭)和 9(最亮)之间的数字来表示:
smile = Image("00000:"
             "09090:"
             "00000:"
             "90009:"
             "09990")

display.show(smile)
备注:MicroBit v1.5的板子不能调整亮度,仅V2板子支持。
图像操作
# 图像反转(亮的变暗,暗的变亮)
inverted = Image.HEART.invert()
display.show(inverted)

# 图像位移
shifted = Image.ARROW_E.shift_left(1)  # 左移1像素
display.show(shifted)
像素级控制
设置单个像素
# 点亮(2,3)位置的LED(亮度9)
display.set_pixel(2, 3, 9)

# 关闭(1,1)位置的LED
display.set_pixel(1, 1, 0)
- 坐标范围:x (0-4), y (0-4)
- 亮度范围:0 (关) 到 9 (最亮)
获取像素状态
brightness = display.get_pixel(0, 4) # 返回(0,4)的亮度值
动画效果
图像序列动画
# 创建动画帧
frames = [
    Image("00000:00000:00900:00000:00000"),
    Image("00000:09990:09090:09990:00000"),
    Image("99999:90009:90009:90009:99999")
]

# 播放动画
display.show(frames, delay=200, loop=True, clear=True)
- delay: 帧间隔(毫秒)
- loop: 是否循环播放
- clear: 播放结束后是否清屏
动态生成动画
# 创建心跳动画
while True:
    display.show(Image.HEART)
    sleep(500)
    display.show(Image.HEART_SMALL)
    sleep(500)
实用技巧与示例
显示传感器数据
while True:
    temp = temperature()
    # 温度值显示在中间列
    display.show(str(temp)[0:5])  # 最多显示5字符
    sleep(1000)
创建简单游戏
# 简单的点灯游戏
x, y = 2, 2
display.set_pixel(x, y, 9)

while True:
    if button_a.was_pressed():
        display.set_pixel(x, y, 0)
        x = (x + 1) % 5
        display.set_pixel(x, y, 9)

    if button_b.was_pressed():
        display.set_pixel(x, y, 0)
        y = (y + 1) % 5
        display.set_pixel(x, y, 9)
调试技巧
串口输出:结合print()调试显示逻辑
print("Current temperature:",temperature())
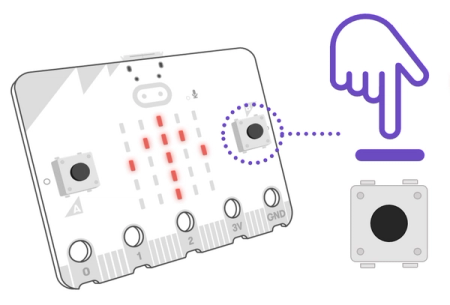
按钮(button)
Micro:bit 正面有两个
按钮。 按钮 A 和按钮 B 可用作输入,以便在按下它们时在程序中进行一些操作。
button_a, button_b对象的方法:is_pressed(), was_pressed(), get_presses()。
button_a.get_presses()
- 统计型方法:返回整数,代表按压次数而不是布尔值
- 累加计数:自动记录自上次读取以来的完整按压
- 自动重置:每次调用后自动清零计数器
- 完整按压要求:只统计”按下并释放”的完整按压序列
button_a.is_pressed() vs button_a.was_pressed() 全面解析
在 MicroPython 的 Micro:bit 编程中,这两种方法都是用于检测按钮状态的,但它们的用途和内部机制有显著区别。理解这些差异对于开发响应式的用户交互程序至关重要。
核心区别对比表
| 特性 | button_a.is_pressed() | button_a.was_pressed() |
| 检测内容 | 按钮当前物理状态 | 自上次检查后的按钮状态变化 |
| 返回值时间窗口 | 当前瞬间状态 | 从上一次调用到当前的变化 |
| 返回类型 | 布尔值 (True/False) | 布尔值 (True/False) |
| 状态重置 | 无自动重置 | 检测后自动重置 |
| 典型用途 | 持续检测(如长按) | 单次动作检测(如点击) |
| 调用频率影响 | 无 | 高频率调用可能导致忽略事件 |
| 编程范式 | 状态检测 | 事件检测 |
button_a.is_pressed()
- 工作原理:直接检查按钮当前的物理状态
- 行为特点:
- 只要按钮被按住,始终返回True
- 松开后立即返回False
- 不记录历史状态变化
- 适用场景:
# 长按检测示例
from microbit import *

while True:
    if button_a.is_pressed():
        display.show(Image.ARROW_E)  # 持续显示右箭头
    else:
        display.clear()
button_a.was_pressed()
- 工作原理:检测从上一次调用该方法到现在的按钮变化
- 行为特点:
- 仅在按钮按下并释放(完成一次完整点击)后返回True
- 返回True 后自动重置状态
- 如果调用间隔中未发生完整点击,返回False
- 最佳实践场景:
# 单次点击计数示例
from microbit import *

count = 0

while True:
    if button_a.was_pressed():
        count += 1
        display.show(count)
        sleep(200)  # 防抖延时
常见误用场景与解决方案
误用1:高频调用导致事件丢失
# 错误示范
while True:
    if button_a.was_pressed():
        # 如果循环执行太快,可能错过快速点击
        do_something()

# 解决方案:添加适当延时
while True:
    if button_a.was_pressed():
        do_something()
    sleep(100)  # 100ms间隔足以检测人类点击速度
误用2:误用is_pressed()检测单次点击
# 错误示范
while True:
    if button_a.is_pressed():
        # 会多次触发而不是仅一次
        increment_counter()

# 正确方法:添加状态机
clicked = False
while True:
    if button_a.is_pressed() and not clicked:
        increment_counter()
        clicked = True
    elif not button_a.is_pressed():
        clicked = False
高级使用技巧
组合使用实现双击检测
from microbit import *
import time

last_press = 0
double_click_threshold = 500  # 500ms间隔内算双击

while True:
    if button_a.was_pressed():
        current = time.ticks_ms()
        if current - last_press < double_click_threshold:
            display.show(Image.YES)  # 检测到双击
        last_press = current
创建长按/短按区别
from microbit import *

long_press_time = 1000  # 1秒算长按

while True:
    if button_a.is_pressed():
        start = time.ticks_ms()
        while button_a.is_pressed():
            elapsed = time.ticks_diff(time.ticks_ms(), start)
            if elapsed > long_press_time:
                display.scroll("Long press")
                break
        else:
            display.scroll("Short press")
Microbit 按钮技术细节
内部状态机
- 每次调用was_pressed() 后,内部状态标志被清除
- 实际点击检测:按下 → 释放(才算一次完整点击)
- 硬件消抖:Microbit 有约 20ms 的硬件消抖滤波
内置传感器
Micro:bit 内置了多种传感器,让开发者无需额外硬件即可创建丰富的交互项目。V1.5 和 V2.0 版本在传感器方面有显著差异。
传感器概览对比表
| 传感器类型 | V1.5 | V2.0 | 主要区别 |
| 加速度计 | ✓ | ✓ | V2.0 灵敏度更高 |
| 磁力计 | ✓ | ✓ | V2.0 精度提升 |
| 温度传感器 | ✓ | ✓ | 相同实现 |
| 光线传感器 | ✗ | ✓ | V2.0 新增功能 |
| 麦克风 | ✗ | ✓ | V2.0 新增功能 |
| 触摸感应 | ✗ | ✓ | V2.0 新增功能 |
加速度计 (Accelerometer)
用途:检测运动、倾斜、震动和自由落体
from microbit import *

while True:
    # 读取三轴加速度值(单位:毫g)
    x = accelerometer.get_x()
    y = accelerometer.get_y()
    z = accelerometer.get_z()

    # 检测特定动作
    if accelerometer.is_gesture("shake"):
        display.show(Image.SURPRISED)

    # 检测倾斜方向
    if accelerometer.current_gesture() == "face up":
        display.show(Image.HAPPY)

    sleep(100)
磁力计 (Compass)
用途:检测磁场强度、方向(电子罗盘)。
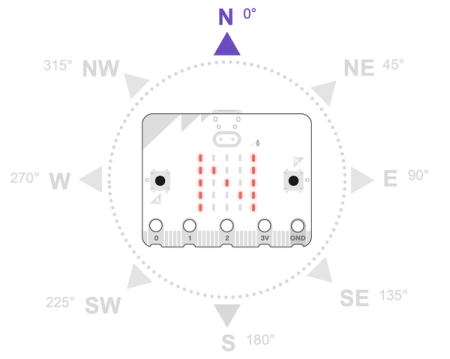
第一次使用罗盘时,您可能会被要求通过玩一个小游戏来校准它。 在显示屏上滚动显示 ‘TILT TO FILL SCREEN‘。 倾斜 micro:bit 直到每个 LED 灯都亮起,然后会出现一张快乐的脸。 该操作可确保罗盘能够提供准确的读数。
from microbit import *

# 必须先校准
compass.calibrate()

while True:
    # 获取方向(0-360度)
    heading = compass.heading()

    # 获取磁场强度(微特斯拉)
    x, y, z = compass.get_x(), compass.get_y(), compass.get_z()

    # 显示方向箭头
    if heading < 45 or heading > 315:
        display.show(Image.ARROW_N)  # 北
    elif heading < 135:
        display.show(Image.ARROW_E)  # 东

    sleep(500)
温度传感器
用途:测量处理器温度(非环境温度)
from microbit import *

while True:
    temp = temperature()  # 摄氏度
    display.scroll(f"{temp}C")
    sleep(5000)
注意:测量的是处理器温度,通常比环境温度高3-5°C
光线传感器 (仅V2.0)
用途:测量环境光强度
# 仅适用于V2.0
from microbit import *

while True:
    # 获取光线强度 (0-255)
    light_level = display.read_light_level()
    print(light_level)
    sleep(1000)
V2.0特性:
- 使用LED矩阵反向测量光线
- 适合检测光照变化而非绝对亮度
- 可用于创建光控开关
麦克风 (仅V2.0)
用途:检测声音级别和事件
# 仅适用于V2.0
from microbit import *

# 设置声音事件阈值
microphone.set_threshold(SoundEvent.LOUD, 128)

while True:
    # 获取当前声音级别 (0-255)
    level = microphone.sound_level()
    print(level)

    # 检测特定声音事件
    if microphone.current_event() == SoundEvent.LOUD:
        display.show(Image.SURPRISED)
    elif microphone.was_event(SoundEvent.QUIET):
        display.show(Image.ASLEEP)

    sleep(100)
高级功能:
- get_events():获取所有待处理的声音事件
- set_analog_period(period):设置模拟信号周期
- 可用于拍手检测、声音激活项目
触摸感应 (仅V2.0)
用途:检测电容触摸
# 仅适用于V2.0
from microbit import *

while True:
    # 检测引脚触摸
    if pin0.is_touched():
        display.show("0")

    # 检测Logo区域触摸(金手指)
    if pin_logo.is_touched():
        display.show(Image.HEART)

    sleep(200)
可用触摸点:
- 引脚:0, 1, 2, 3, 4, 5, 6, 7, 9, 10
- Logo区域:pin_logo
- 可用于创建触摸开关、交互式界面
扬声器 (仅V2.0)
用途:播放声音和音乐
# 仅适用于V2.0
from microbit import *
import music
import speech
import audio

# 您可以设置 micro:bit 播放音乐的节奏或速度: 节奏以 bpm 为单位,即每分钟节拍数。 数字低于 120 表示比正常节奏慢,高于 120 表示比正常节奏快。
music.set_tempo(bpm=120)

# 播放内置音乐
music.play(music.BIRTHDAY)

# 播放音符
music.play(['c', 'd', 'e', 'c'])

# 音调 micro:bit 可以播放由频率或音调定义的声音
music.pitch(440)

# 语音合成(完全听不清)
speech.say("Hello world", speed=120)

# 播放内置声音
audio.play(Sound.HELLO)
引脚操作指南
Micro:bit 的引脚系统是其最强大的功能之一,允许开发者连接各种外部设备和传感器。
引脚功能分类
| 引脚 | 数字I/O | 模拟输入 | 模拟输出(PWM) | 触摸感应(V2) | 特殊功能 |
| 0 | ✓ | ✓ | ✓ | ✓ | UART RX |
| 1 | ✓ | ✓ | ✓ | ✓ | UART TX |
| 2 | ✓ | ✓ | ✓ | ✓ | – |
| 3 | ✓ | ✓ | ✓ | ✓ | LED行1 |
| 4 | ✓ | ✓ | ✓ | ✓ | LED行2 |
| 5 | ✓ | ✓ | ✓ | ✓ | 按钮A |
| 6 | ✓ | ✓ | ✓ | ✓ | LED列1 |
| 7 | ✓ | ✓ | ✓ | ✓ | LED列2 |
| 8 | ✓ | ✓ | ✓ | ✓ | – |
| 9 | ✓ | ✓ | ✓ | ✓ | 按钮B |
| 10 | ✓ | ✓ | ✓ | ✓ | – |
| 11 | – | – | – | – | 保留 |
| 12 | – | – | – | – | 保留 |
| 13 | ✓ | – | – | – | SPI SCK |
| 14 | ✓ | – | – | – | SPI MISO |
| 15 | ✓ | – | – | – | SPI MOSI |
| 16 | ✓ | – | – | – | SPI CS |
| 19 | ✓ | – | – | – | I2C SCL |
| 20 | ✓ | – | – | – | I2C SDA |
| LOGO | – | – | – | ✓ | V2触摸区 |
基础引脚操作
数字输入/输出
from microbit import *

# 设置引脚为输出模式
pin0.write_digital(1)  # 输出高电平 (3.3V)
pin0.write_digital(0)  # 输出低电平 (0V)

# 读取数字输入
value = pin1.read_digital()  # 返回0或1
if value == 1:
    display.show(Image.YES)
模拟输入
# 读取模拟值 (0-1023)
light_level = pin2.read_analog()  # 光敏电阻示例
display.scroll(str(light_level))

# 电压计算
voltage = pin2.read_analog() * 3.3 / 1023
PWM输出
# 设置PWM占空比 (0-1023)
pin0.write_analog(512)  # 50%占空比

# 控制舵机角度 (0-180度)
def set_servo_angle(pin, angle):
    pulse_width = 500 + (angle * 2000 // 180)  # 500-2500μs
    duty_cycle = pulse_width * 1024 // 20000  # 20ms周期
    pin.write_analog(duty_cycle)

set_servo_angle(pin0, 90)  # 舵机转到90度
高级引脚功能
触摸感应 (V2专有)
if pin0.is_touched():
    display.show(Image.HAPPY)

# 读取原始触摸值
touch_value = pin0.read_analog()  # 0-1023

# Logo区域触摸
if pin_logo.is_touched():
    display.show(Image.HEART)
中断处理
def on_pin_rise():
    display.show("R")

# 设置中断处理
pin0.on_event(PinEvent.RISE, on_pin_rise)  # 上升沿触发
pin1.on_event(PinEvent.FALL, lambda: display.show("F"))  # 下降沿
pin2.on_event(PinEvent.TOUCH, lambda: display.show("T"))  # V2触摸
脉冲测量
# 测量脉冲宽度 (微秒)
pulse_width = pin0.read_pulse_high()  # 高电平时间
pulse_width = pin0.read_pulse_low()   # 低电平时间

# 超声波测距示例
def measure_distance(trigger, echo):
    # 发送10μs触发脉冲
    trigger.write_digital(1)
    sleep(10)
    trigger.write_digital(0)

    # 测量回波脉冲宽度
    duration = echo.read_pulse_high()

    # 计算距离 (声速340m/s)
    distance = (duration * 0.034) / 2  # cm
    return distance

dist = measure_distance(pin0, pin1)
通信协议支持
I2C通信
from microbit import i2c

# 扫描I2C设备
devices = []
for addr in range(0, 128):
    try:
        i2c.read(addr, 1)
        devices.append(addr)
    except:
        pass

# 读取加速度计数据 (地址0x19)
i2c.write(0x19, b'\x28')  # 设置寄存器
data = i2c.read(0x19, 6)  # 读取6字节
x = (data[1] << 8) | data[0]
SPI通信
from microbit import spi

# 初始化SPI
spi.init(baudrate=1000000, bits=8, mode=0,
         sclk=pin13, mosi=pin15, miso=pin14)

# 发送数据
spi.write(b'\x01\x02\x03')

# 同时发送和接收
received = spi.write_read(b'\xAA\x55')
UART串口通信
from microbit import uart

# 初始化UART
uart.init(baudrate=9600, bits=8, parity=None, stop=1, tx=pin0, rx=pin1)

# 发送数据
uart.write("Hello World\n")

# 接收数据
if uart.any():
    data = uart.read()
    display.scroll(data)
引脚配置选项
上拉/下拉电阻
# 设置内部上拉电阻
pin0.set_pull(pin0.PULL_UP)   # 默认高电平
pin1.set_pull(pin1.PULL_DOWN) # 默认低电平
pin2.set_pull(pin2.NO_PULL)   # 无上拉/下拉
省电技巧
# 关闭未使用引脚
def disable_unused_pins():
    for pin in [pin8, pin11, pin12, pin13, pin14, pin15, pin16]:
        pin.set_pull(pin.NO_PULL)
        pin.write_digital(0)
引脚模式设置
# 设置引脚为模拟输入
pin0.set_analog_period(20)  # 设置PWM周期(毫秒)

# 设置触摸模式(V2)
pin0.set_touch_mode(True)  # 启用触摸检测
引脚状态检测
# 获取引脚模式
mode = pin0.get_mode()  # 返回: digital_in, digital_out, analog, touch

# 获取引脚编号
pin_num = pin0.get_id()
引脚冲突管理
引脚复用机制
Micro:bit 的物理引脚与内部功能复用关系:
P0:LED列1、ADC输入、GPIO
P1:LED列2、ADC输入、GPIO
P2:LED列3、ADC输入、GPIO
P3:LED行1、GPIO
P4:LED行2、GPIO
P5:按钮A、GPIO
P6:LED行3、GPIO
P7:LED列4、GPIO
P8:预留
P9:LED列5、GPIO
P10:LED列6、GPIO
P11:按钮B、GPIO
P12:预留
P13:SPI时钟
P14:SPI数据输入
P15:SPI数据输出
P16:预留
P19:I2C数据
P20:I2C时钟
常见冲突场景
- LED矩阵与GPIO使用冲突
- 按钮引脚(P5/P11)与其他功能冲突
- I2C/SPI总线与自定义外设冲突
- 模拟输入与数字输出冲突
硬件层解决方案
禁用冲突功能
# 禁用LED矩阵以释放P3-P4,P6-P7,P9-P10
def safe_pin_write(pin, value):
    if pin in [pin3, pin4, pin6, pin7, pin9, pin10]:
        display.off()
        pin.write_digital(value)
        display.on()
    else:
        pin.write_digital(value)
引脚重映射
# I2C重映射到其他引脚
i2c.init(freq=100000, sda=pin1, scl=pin2)

# SPI重映射
spi.init(baudrate=1000000, mosi=pin16, miso=pin17, sclk=pin18)
使用非冲突引脚
优先使用无复用功能的引脚:
- P0, P1, P2 (但注意LED列控制)
- P8, P12, P13-P16, P19-P20
软件层解决方案
分时复用技术
import microbit

def run_led_matrix():
    display.on()
    display.show(Image.HEART)
    sleep(1000)
    display.off()

def read_sensor():
    # 在LED关闭时读取传感器
    return pin1.read_analog()

while True:
    run_led_matrix()
    sensor_value = read_sensor()
    # 处理传感器数据...
    sleep(1000)
中断优先级管理
from microbit import *

# 高优先级中断
def critical_irq():
    # 紧急处理代码
    pass

# 低优先级任务
def normal_task():
    # 非关键功能
    pass

# 配置中断优先级
pin0.irq(trigger=Pin.IRQ_RISING, handler=critical_irq, priority=1)
引脚状态缓存
pin_state_cache = {}

def safe_pin_write(pin, value):
    # 检查引脚状态
    if pin in pin_state_cache and pin_state_cache[pin] != value:
        # 解决冲突逻辑
        resolve_conflict(pin)

    pin.write_digital(value)
    pin_state_cache[pin] = value
高级冲突解决方案
多路复用器扩展
使用CD74HC4067等芯片扩展引脚:
# 控制多路复用器选择通道
def select_mux_channel(channel):
    pin8.write_digital(channel & 1)
    pin12.write_digital((channel >> 1) & 1)
    pin16.write_digital((channel >> 2) & 1)

# 读取16个模拟传感器
for ch in range(16):
    select_mux_channel(ch)
    value = pin2.read_analog()
I2C总线扩展
使用I2C GPIO扩展芯片(如PCF8574):
# 初始化I2C
i2c.init()

# PCF8574地址
PCF_ADDR = 0x20

# 设置扩展引脚输出
def set_expander_pins(value):
    i2c.write(PCF_ADDR, bytes([value]))

# 读取扩展引脚
def read_expander_pins():
    return i2c.read(PCF_ADDR, 1)[0]
虚拟引脚系统
class VirtualPin:
    def __init__(self, physical_pin):
        self.phys_pin = physical_pin
        self.mode = None

    def set_mode(self, mode):
        if self.mode and self.mode != mode:
            raise PinConflictError(f"Pin {self.phys_pin} mode conflict")
        self.mode = mode

    def write_digital(self, value):
        self.set_mode('digital_out')
        self.phys_pin.write_digital(value)

    def read_analog(self):
        self.set_mode('analog_in')
        return self.phys_pin.read_analog()

# 使用虚拟引脚
vpin0 = VirtualPin(pin0)
特定冲突场景解决方案
LED矩阵与传感器冲突
# 自定义LED刷新函数避免冲突
def safe_display_show(image):
    display.off()
    # 快速刷新LED
    for _ in range(5):  # 刷新5次保证可见
        display.show(image)
        sleep(50)
    display.off()

# 主循环
while True:
    sensor_val = pin1.read_analog()
    safe_display_show(Image.HEART)
    sleep(1000)
按钮与GPIO冲突
# 使用中断代替轮询
def button_a_handler():
    # 按钮A处理逻辑
    pass

# 安全配置按钮中断
if not pin5.is_touched():
    pin5.set_touch_mode(pin5.RESISTIVE)
    pin5.irq(trigger=pin5.IRQ_TOUCH, handler=button_a_handler)
I2C总线设备冲突
# I2C设备分时复用
def read_i2c_device(address, register):
    # 保存当前I2C状态
    saved_sda = i2c.sda
    saved_scl = i2c.scl

    # 配置I2C
    i2c.init(sda=pin1, scl=pin2)

    # 读取设备
    i2c.write(address, bytes([register]))
    data = i2c.read(address, 1)

    # 恢复I2C状态
    i2c.init(sda=saved_sda, scl=saved_scl)

    return data
调试与诊断工具
引脚状态监控
def print_pin_status():
    pins = [pin0, pin1, pin2, pin3, pin4, pin5, pin6,
            pin7, pin8, pin9, pin10, pin11, pin12,
            pin13, pin14, pin15, pin16, pin19, pin20]

    for i, p in enumerate(pins):
        try:
            mode = "IN" if p.get_mode() == 0 else "OUT"
            value = p.read_digital() if mode == "IN" else "-"
            print(f"P{i}: {mode} {value}")
        except:
            print(f"P{i}: Conflict!")
冲突检测算法
def detect_conflicts():
    # 检查LED引脚
    led_pins = [pin3, pin4, pin6, pin7, pin9, pin10]
    for p in led_pins:
        if p.read_digital() != 0 and display.is_on():
            print(f"LED conflict on P{led_pins.index(p)+3}")

    # 检查按钮引脚
    if pin5.read_digital() == 0 and button_a.is_pressed():
        print("Button A conflict")

    # 检查I2C引脚
    if pin19.read_digital() == 0 or pin20.read_digital() == 0:
        print("I2C pins in use")
最佳实践指南
引脚使用优先级:
- 优先使用P0、P1、P2(模拟功能)
- 其次使用P8、P12、P13-P16
- 最后考虑复用引脚(P3-P4,P6-P7,P9-P11)
无线电通信(radio)
Micro:bit 的无线电模块是其最强大的功能之一,允许设备之间进行无线通信。这个功能基于蓝牙低功耗(BLE)技术,但提供了更简单的抽象接口。
硬件基础架构
Micro:bit 的无线电功能通过主控芯片内置的射频模块实现:
| 版本 | 主控芯片 | 射频模块 | 关键特性 |
| V1.5 | Nordic nRF51822 | 2.4GHz 射频收发器 | BLE 4.0,最大速率1Mbps |
| V2.0 | Nordic nRF52833 | 增强型2.4GHz收发器 | BLE 5.1,支持2Mbps高速模式 |
核心组件:
- 射频收发器:负责信号的调制/解调
- 频率合成器:生成4GHz工作频率
- 功率放大器:可配置发射功率(-20dBm至+4dBm)
- 基带处理器:处理数据包和协议栈
- 天线系统:PCB集成倒F天线(工作在4GHz)
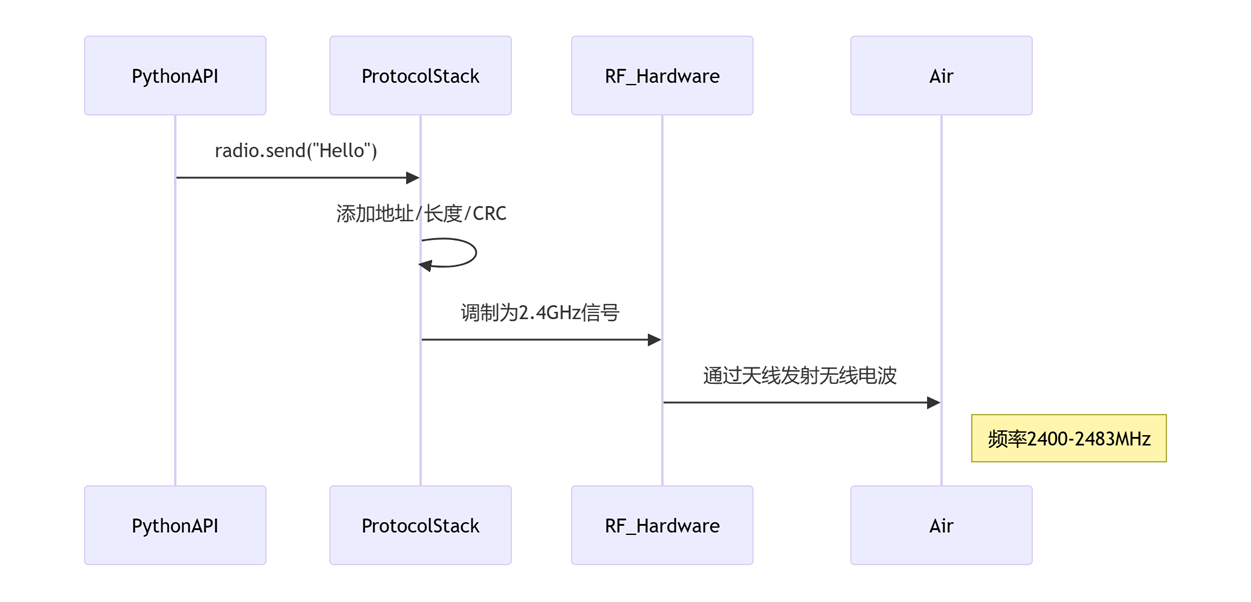
无线电工作原理
发送过程
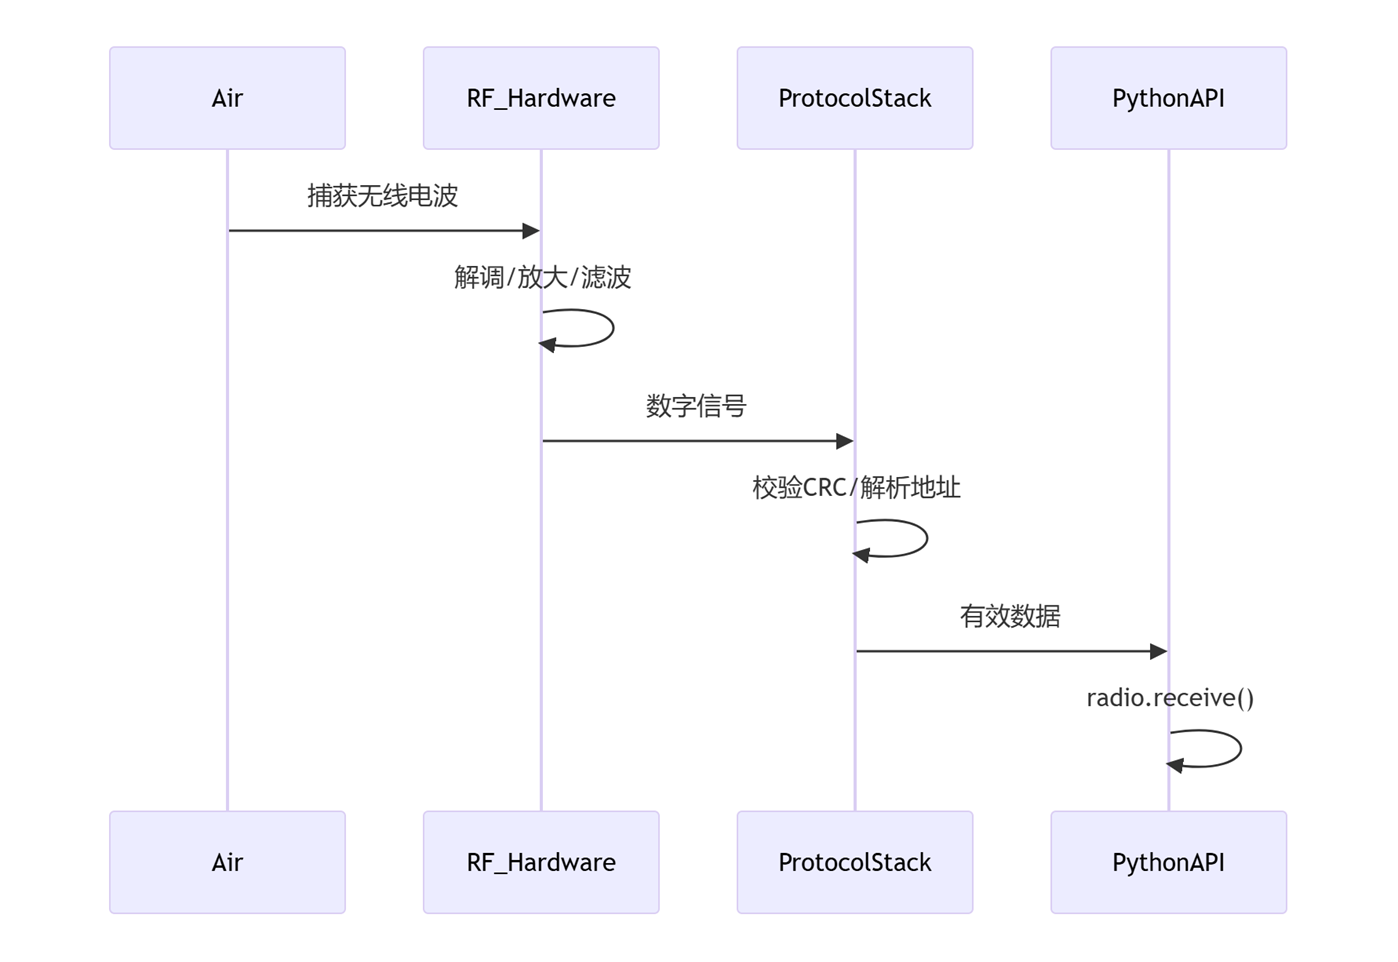
接收过程
核心技术特点
物理层深度解析
信号传播特性
- 衍射:绕过障碍物(但金属会完全阻挡)
- 反射:墙壁等表面反射引起多径干扰
- 衰减:遵循自由空间路径损耗公式:
损耗(dB) = 32.44 + 20*log10(f) + 20*log10(d)
- f=频率MHz
- d=距离km
例如:2.4GHz@10米 ≈ 60dB损耗
实际性能指标
| 指标 | V1.5 | V2.0 | 测试条件 |
| 理论带宽 | 1Mbps | 2Mbps | 无干扰环境 |
| 实测吞吐量 | 80Kbps | 210Kbps | 32字节包长 |
| 有效距离 | 30米 | 70米 | 开阔场地 |
| 延迟 | 2-5ms | 1-3ms | 设备对传 |
| 功耗 | 发送:15mA 接收:12mA |
发送:13mA 接收:10mA |
功率等级0 |
| 同时连接 | 6-8台 | 12-16台 | 星型网络 |
与标准无线技术对比
| 特性 | Micro:bit Radio | Bluetooth BLE | Wi-Fi | Zigbee |
| 拓扑结构 | 网状/星型 | 点对点/星型 | 星型 | 网状 |
| 连接建立 | 即时 | 需配对 | 需关联 | 需组网 |
| 适用距离 | <100米 | <100米 | <100米 | <100米 |
| 典型速率 | 200Kbps | 1Mbps | >1Mbps | 250Kbps |
| 功耗 | 极低 | 低 | 高 | 极低 |
| 抗干扰 | 中等 | 高 | 高 | 高 |
无线电模块基础
基本使用步骤
import radio  # 导入模块
radio.on()    # 启用无线电
radio.config(channel=7)  # 设置频道(0-100)

# 发送消息
radio.send("Hello Micro:bit!")

# 接收消息
incoming = radio.receive()
if incoming:
    display.scroll(incoming)
完整配置参数
radio.config(
    length=32,       # 消息长度(1-251字节)
    queue=3,         # 接收队列大小
    channel=7,       # 通信频道(0-100)
    power=6,         # 发射功率(0-7,7最强)
    data_rate=radio.RATE_1MBIT,  # 传输速率
    address=0x756269, # 地址(类似MAC地址)
    group=0,         # 组号(0-255)
    security=None    # 安全设置(V2新增)
)
重要参数说明
| 参数 | 范围 | 默认值 | 说明 |
| channel | 0-100 | 7 | 避免WiFi常用频道(1,6,11) |
| power | 0-7 | 6 | 7=最大功率(+4dBm),0=最低功率(-30dBm) |
| data_rate | RATE_250KBIT RATE_1MBIT RATE_2MBIT |
RATE_1MBIT | V2支持所有速率,V1仅支持1MBIT |
| group | 0-255 | 0 | 逻辑分组,只接收同组消息 |
| length | 1-251 | 32 | 较大值增加吞吐量但降低可靠性 |
核心API详解
发送消息
# 发送字符串
radio.send("Temperature:25C")

# 发送字节数据
data = b'\x01\x02\x03\x04'
radio.send_bytes(data)

# 发送结构化数据(推荐)
import ustruct
packet = ustruct.pack('4sif', b"DATA", 42, 3.14)
radio.send_bytes(packet)
接收消息
# 接收字符串
msg = radio.receive()
if msg:
    print("Received:", msg)

# 接收字节数据
data = radio.receive_bytes()
if data:
    # 解析结构化数据
    id, value, temp = ustruct.unpack('4sif', data)
高级接收(V2)
# 接收完整数据包(含元数据)
packet = radio.receive_full()
if packet:
    payload, rssi, timestamp = packet
    print(f"Payload: {payload}, RSSI: {rssi}dBm, Time: {timestamp}ms")
通信协议设计
简单文本协议
# 发送端
radio.send(f"TEMP:{temperature()},LIGHT:{light_level}")

# 接收端
msg = radio.receive()
if msg and msg.startswith("TEMP:"):
    parts = msg.split(',')
    temp = float(parts[0].split(':')[1])
    light = int(parts[1].split(':')[1])
二进制协议
# 定义协议格式
# 字节0: 数据类型 (1=温度, 2=湿度...)
# 字节1-4: 浮点数值
# 字节5: 校验和

def create_packet(data_type, value):
    data = bytearray(6)
    data[0] = data_type
    data[1:5] = ustruct.pack('f', value)
    data[5] = sum(data[0:5]) & 0xFF  # 简单校验
    return data

# 解析数据
def parse_packet(data):
    if len(data) != 6 or sum(data[0:5]) & 0xFF != data[5]:
        return None  # 校验失败
    data_type = data[0]
    value = ustruct.unpack('f', data[1:5])[0]
    return (data_type, value)
安全通信(V2专有)
AES-128加密
from radio import security
import cryptolib

# 设置加密密钥(16字节)
key = b'MicrobitSecret!'
security.set_key(key)

# 启用加密
radio.config(security=security.AES)

# 发送加密数据(自动加密)
radio.send("Sensitive data")

# 接收时自动解密
msg = radio.receive()  # 已解密
地址过滤
# 设置允许的地址列表
allowed_addresses = [0x123456, 0x789ABC]
security.set_address_filter(allowed_addresses)

# 只接收来自这些地址的消息
高级技巧与优化
省电策略
# 间歇性唤醒
while True:
    radio.on()
    # 发送/接收数据
    radio.send("Ping")
    sleep(100)  # 等待响应

    radio.off()  # 关闭无线电省电
    sleep(9000)  # 休眠9秒
信号强度检测(RSSI)
# V2支持接收信号强度指示
packet = radio.receive_full()
if packet:
    _, rssi, _ = packet
    # RSSI是负值,值越大信号越好(如-50比-70好)
    if rssi > -70:  # 良好信号
        display.show(Image.YES)
抗干扰技术
# 频道跳频
channels = [7, 23, 42, 56]
current_channel = 0

while True:
    radio.config(channel=channels[current_channel])
    # 通信...

    # 定期切换频道
    if button_a.was_pressed():
        current_channel = (current_channel + 1) % len(channels)
数据压缩
import zlib  # V2支持

# 发送压缩数据
data = "Long text message..." * 10
compressed = zlib.compress(data.encode())
radio.send_bytes(compressed)

# 接收端
compressed = radio.receive_bytes()
if compressed:
    data = zlib.decompress(compressed).decode()
调试与故障排除
常见问题
- 无通信:检查频道、组号、无线电是否开启
- 数据丢失:减少数据长度、降低传输速率
- 干扰:避开WiFi频道(1,6,11)
- 距离短:增加发射功率(config(power=7))
调试工具
# 无线电状态监测
def radio_status():
    print("Channel:", radio.config().get('channel', 'N/A'))
    print("Queue size:", len(radio.receive_bytes()))
    # V2特有
    if hasattr(radio, 'rssi'):
        print("RSSI:", radio.rssi())
性能测试
# 吞吐量测试
import time

radio.on()
radio.config(length=251, data_rate=radio.RATE_2MBIT)

start = time.ticks_ms()
count = 0
data = b'x' * 250  # 250字节数据

while time.ticks_diff(time.ticks_ms(), start) < 5000:  # 5秒测试
    radio.send_bytes(data)
    count += 1
蓝牙功能
Micro:bit 的蓝牙功能是其最强大的特性之一,允许设备与其他蓝牙设备(如手机、电脑)进行无线通信。
蓝牙功能概述
硬件支持
- 5:支持蓝牙4.0(BLE)
- 0:支持蓝牙5.0(BLE),兼容蓝牙4.0,提供更快的速度和更远的距离
核心功能
- 与智能手机/平板配对通信
- 无线编程(无需USB线)
- 创建自定义蓝牙服务
- 与其他Micro:bit通信(通过蓝牙而非无线电)
- 低功耗模式(节省电池)
基础蓝牙操作
启用蓝牙
import bluetooth
bluetooth.init()  # 初始化蓝牙模块
设置设备名称
bluetooth.set_device_name("MyMicrobit")
开始广播
bluetooth.start_advertising(interval=200) # 广播间隔200ms
检测连接状态
if bluetooth.is_connected():
    display.show(Image.HAPPY)
else:
    display.show(Image.SAD)
蓝牙配对与连接
手机配对流程
- Micro:bit运行蓝牙程序
- 手机蓝牙设置中搜索”MyMicrobit”
- 配对连接(无需PIN码)
- 使用蓝牙调试App(如nRF Connect)查看服务
连接管理
# 获取连接句柄
conn_handle = bluetooth.connection()

# 断开连接
bluetooth.disconnect()
创建蓝牙服务
定义服务UUID
from bluetooth import UUID

# 自定义服务UUID
SERVICE_UUID = UUID(0x180F)
CHAR_UUID = UUID(0x2A19)
创建特征
battery_char = bluetooth.Characteristic(
    CHAR_UUID,
    bluetooth.FLAG_READ,  # 只读特征
    value="50%",           # 初始值
    max_len=5              # 最大长度
)
创建服务
battery_service = bluetooth.Service(
    SERVICE_UUID,
    [battery_char],  # 包含的特征列表
    nbr_chars=1      # 特征数量
)
注册服务
bluetooth.add_service(battery_service)
数据通信
读取数据
# 更新特征值
bluetooth.update_char_value(battery_char, "75%")

# 在手机端读取将得到"75%"
写入数据
# 创建可写特征
led_char = bluetooth.Characteristic(
    UUID(0xFFE1),
    bluetooth.FLAG_WRITE,
    max_len=1
)

# 写入回调函数
def on_write(conn_handle, char_handle, value):
    if value == b'\x01':
        display.show(Image.YES)
    elif value == b'\x00':
        display.clear()

bluetooth.set_write_callback(on_write)
通知功能
# 创建支持通知的特征
temp_char = bluetooth.Characteristic(
    UUID(0x2A6E),
    bluetooth.FLAG_READ | bluetooth.FLAG_NOTIFY
)

# 启用通知
bluetooth.char_notify_enable(temp_char)

# 更新值并通知
while True:
    temp = temperature()
    bluetooth.update_char_value(temp_char, f"{temp}C")
    sleep(5000)
无线编程(蓝牙DFU)
启用无线编程模式
# 在main.py中添加
import bluetooth
bluetooth.enable_irq(handler=None)
bluetooth.set_advertising(interval=200, name="MicrobitDFU")
手机端操作
- 安装”Micro:bit”官方App
- 搜索并连接Micro:bit
- 选择hex文件上传
- 等待编程完成(LED闪烁)
蓝牙与无线电协同
蓝牙网关
import bluetooth
import radio

radio.on()
bluetooth.init()

def on_bluetooth_data(data):
    # 将蓝牙数据转发到无线电
    radio.send(data)

def on_radio_data():
    # 将无线电数据转发到蓝牙
    data = radio.receive()
    bluetooth.send(data)

# 主循环
while True:
    if bluetooth.is_connected():
        data = bluetooth.receive()
        if data:
            on_bluetooth_data(data)

    if radio.any():
        on_radio_data()

    sleep(100)
高级功能
低功耗模式
# 配置低功耗参数
bluetooth.config(
    power=0,            # 最低发射功率
    interval=1000,       # 广播间隔1秒
    timeout=30           # 30秒无连接停止广播
)

# 深度睡眠
if not bluetooth.is_connected():
    bluetooth.stop_advertising()
    microbit.sleep(10000)  # 休眠10秒
安全配对
# V2支持安全配对
bluetooth.set_security(
    level=bluetooth.SECURITY_MEDIUM,
    bond=True,          # 绑定设备
    mitm=True           # 中间人保护
)

# 设置配对密码
bluetooth.set_passkey("123456")
多连接
# V2支持最多3个连接
if bluetooth.can_accept_connection():
    bluetooth.accept_connection()
调试与问题解决
常见问题
- 无法连接:重启Micro:bit和手机蓝牙
- 服务不可见:确认UUID设置正确
- 数据丢失:减少数据包大小
- 功耗过高:增加广播间隔
调试工具
# 打印蓝牙状态
def print_ble_status():
    print("Connected:", bluetooth.is_connected())
    print("Address:", bluetooth.address())
    print("RSSI:", bluetooth.rssi())
    print("Services:", bluetooth.list_services())
LED状态指示
- 慢闪:广播中
- 快闪:连接建立中
- 常亮:已连接
- 熄灭:未启用蓝牙
文件系统
Micro:bit 的文件系统是其重要功能之一,特别是在 V2 版本中得到了显著增强。以下是对 Micro:bit 文件系统的详细介绍:
文件系统基础
硬件支持
- 5:
- 无专用文件系统存储
- 可通过特殊技巧模拟文件操作(有限)
- 0:
- 512KB Flash 存储器
- 其中 256KB 专用于文件系统
- FAT 格式兼容文件系统
文件系统特性
| 特性 | V1.5 | V2.0 |
| 存储空间 | 无专用空间 | 256KB |
| 文件数量限制 | 无 | 最多约100个文件 |
| 文件大小限制 | 无 | 最大64KB |
| 持久存储 | 重启后丢失 | 断电保持 |
| USB访问 | 不支持 | 支持(MAINTENANCE模式) |
文件系统访问方式
USB 访问模式
- 按住复位按钮
- 连接USB线
- 释放复位按钮
- 电脑显示为”MAINTENANCE”驱动器
- 可直接拖放文件操作
Python API 访问
import os

# 列出文件
files = os.listdir()
print(files)

# 创建文件
with open('data.txt', 'w') as f:
    f.write("Hello Microbit!")

# 读取文件
with open('data.txt', 'r') as f:
    content = f.read()
    print(content)

# 删除文件
os.remove('old.txt')
文件系统管理技巧
空间优化
# 定期清理旧文件
MAX_FILES = 10
MAX_SIZE = 100 * 1024  # 100KB

def cleanup_files():
    files = sorted(os.listdir(), key=os.size, reverse=True)
    total_size = sum(os.size(f) for f in files)

    # 删除最旧的文件直到满足限制
    while len(files) > MAX_FILES or total_size > MAX_SIZE:
        oldest = min(files, key=os.stat)
        size = os.size(oldest)
        os.remove(oldest)
        files.remove(oldest)
        total_size -= size

# 每周清理一次
if running_time() % (7 * 24 * 3600 * 1000) < 1000:
    cleanup_files()
错误处理
def safe_file_op(func, *args):
    try:
        return func(*args)
    except OSError as e:
        if e.args[0] == 28:  # ENOSPC
            display.show(Image.SAD)
            return "存储空间不足"
        elif e.args[0] == 2:  # ENOENT
            return "文件不存在"
        else:
            return f"错误: {e}"

# 安全写入
result = safe_file_op(lambda: open('data.txt', 'w').write("test"))
文件系统检查
def check_fs_integrity():
    files = os.listdir()
    for f in files:
        try:
            with open(f, 'r') as test_file:
                test_file.read(1)
        except OSError:
            print(f"损坏文件: {f}")
            os.remove(f)

    # 检查剩余空间
    usage = os.statvfs('/')
    if usage[3] < 10:  # 少于10个块
        display.show(Image.SKULL)
V1.5 文件系统模拟
EEPROM 模拟
# V1.5使用Flash模拟EEPROM
import microbit

# 写入数据
microbit.storage.store("key", "value")

# 读取数据
value = microbit.storage.load("key")

# 删除数据
microbit.storage.remove("key")
文件系统模拟
# 简单的键值存储模拟文件系统
FILE_SYSTEM = {}

def v1_write_file(name, content):
    FILE_SYSTEM[name] = content

def v1_read_file(name):
    return FILE_SYSTEM.get(name, None)

def v1_list_files():
    return list(FILE_SYSTEM.keys())
注意事项与最佳实践
- 写寿命管理:
- Flash芯片有约10万次擦写寿命
- 避免高频写入同一位置
- 使用追加模式而非覆盖
- 电源安全:
- 写入时避免断电
- 使用sync()确保数据写入
with open('important.dat', 'w') as f:
    f.write(data)
    os.sync()  # 强制写入物理存储
- 文件命名规范:
- 使用3格式(主名8字符,扩展名3字符)
- 避免特殊字符
- 使用小写字母
- 性能优化:
- 批量写入减少文件操作
- 使用二进制格式提高效率
- 避免频繁打开/关闭文件
- 安全考虑:
- 敏感数据加密存储
- 验证文件完整性
- 限制文件访问权限
参考链接:BBC micro:bit MicroPython documentation — BBC micro:bit MicroPython 1.1.1 documentation