!文章内容如有错误或排版问题,请提交反馈,非常感谢!
识别验证码的方式很多,如 tesseract、SVM 等。今天主要学习的是如何使用 KNN 进行验证码的识别。
数据准备
本次实验采用的是 CSDN 的验证码做演练,相关的接口:https://download.csdn.net/index.php/rest/tools/validcode/source_ip_validate/10.5711163911089325
目前接口返回的验证码共 2 种:
纯数字、干扰小的验证码,简单进行图片去除背景、二值化和阈值处理后,使用 kNN 算法即可识别。
字母加数字、背景有干扰、图形字符位置有轻微变形,进行图片去除背景、二值化和阈值处理后,使用 kNN 算法识别
这里选择第二种进行破解。由于两种验证码的图片大小不一样,所以可以使用图片大小来判断哪个是第一种验证码,哪个是第二种验证码。
下载验证码
url = "http://download.csdn.net/index.php/rest/tools/validcode/source_ip_validate/10.5711163911089325"
filename = "./captchas/" + str(uuid.uuid4()) + ".png"
with open(filename, 'wb') as f:
for chunk in resp.iter_content(chunk_size=1024):
if chunk: # filter out keep-alive new chunks
im = Image.open(filename)
import requests
import uuid
from PIL import Image
import os
url = "http://download.csdn.net/index.php/rest/tools/validcode/source_ip_validate/10.5711163911089325"
for i in range(1000):
resp = requests.get(url)
filename = "./captchas/" + str(uuid.uuid4()) + ".png"
with open(filename, 'wb') as f:
for chunk in resp.iter_content(chunk_size=1024):
if chunk: # filter out keep-alive new chunks
f.write(chunk)
f.flush()
f.close()
im = Image.open(filename)
if im.size != (70, 25):
im.close()
os.remove(filename)
else:
print(filename)
分割字符
下载过后,就需要对字母进行分割。分割字符还是一件比较麻烦的工作。
灰度化
将彩色的图片转化为灰度图片,便于后面的二值化处理,示例代码:
file = ".\\captchas\\0a4a22cd-f16b-4ae4-bc52-cdf4c081301d.png"
im_gray = im.convert('L')
from PIL import Image
file = ".\\captchas\\0a4a22cd-f16b-4ae4-bc52-cdf4c081301d.png"
im = Image.open(file)
im_gray = im.convert('L')
im_gray.show()
from PIL import Image
file = ".\\captchas\\0a4a22cd-f16b-4ae4-bc52-cdf4c081301d.png"
im = Image.open(file)
im_gray = im.convert('L')
im_gray.show()
处理前:
处理后:
二值化
灰度化以后,有颜色的像素点为 0-255 之间的值。二值化就是将大于某个值的像素点都修改为 255,小于该值的修改为 0,示例代码:
file = ".\\captchas\\0a4a22cd-f16b-4ae4-bc52-cdf4c081301d.png"
im_gray = im.convert('L')
pix = (pix > threshold) * 255
out = Image.fromarray(pix)
from PIL import Image
import numpy as np
file = ".\\captchas\\0a4a22cd-f16b-4ae4-bc52-cdf4c081301d.png"
im = Image.open(file)
im_gray = im.convert('L')
# im_gray.show()
pix = np.array(im_gray)
print(pix.shape)
print(pix)
threshold = 100 # 阈值
pix = (pix > threshold) * 255
print(pix)
out = Image.fromarray(pix)
out.show()
二值化输出的结果:
去除边框
从二值化输出的结果可以看到除了字符,还存在边框,在切割字符前还需要先将边框去除。
new_pix = pix[border_width:-border_width, border_width:-border_width]
border_width = 1
new_pix = pix[border_width:-border_width, border_width:-border_width]
border_width = 1
new_pix = pix[border_width:-border_width, border_width:-border_width]
字符切割
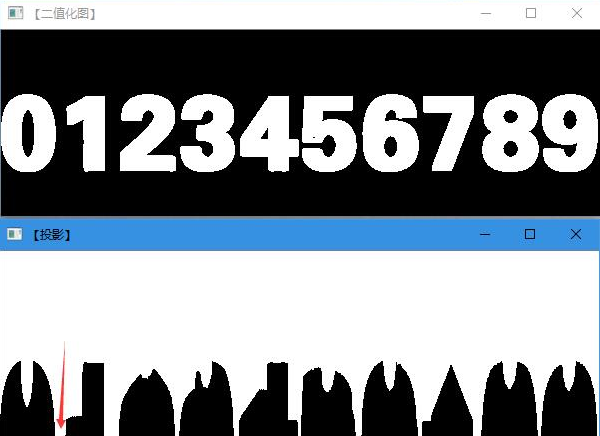
由于字符与字符间没有存在连接,可以使用比较简单的“投影法”进行字符的切割。原理就是将二值化后的图片先在垂直方向进行投影,根据投影后的极值来判断分割边界。分割后的小图片再在水平方向进行投影。

代码实现:
def vertical_image(image):
height, width = image.shape
new_image = np.zeros(image.shape, np.uint8)
cv2.line(new_image, (x, 0), (x, h[x]), 255, 1)
cv2.imshow('vert_image', new_image)
def vertical_image(image):
height, width = image.shape
h = [0] * width
for x in range(width):
for y in range(height):
s = image[y, x]
if s == 255:
h[x] += 1
new_image = np.zeros(image.shape, np.uint8)
for x in range(width):
cv2.line(new_image, (x, 0), (x, h[x]), 255, 1)
cv2.imshow('vert_image', new_image)
cv2.waitKey()
cv2.destroyAllWindows()
整体代码
im = Image.open(filename)
im_gray = im.convert('L')
image = np.array(im_gray)
pix = (image > threshold) * 255
new_image = pix[border_width:-border_width, border_width:-border_width]
height, width = image.shape
if not in_line and h[i] >= blank_distance:
elif in_line and h[i] < blank_distance:
height, width = image.shape
if not in_line and h[i] >= blank_distance:
elif in_line and i == len(h) - 1:
row_rect = (start_line, i)
elif in_line and h[i] < blank_distance:
row_rect = (start_line, i)
def get_block_image(image, col_rect):
col_image = image[0:image.shape[0], col_rect[0]:col_rect[1]]
row_rect = get_row_rect(col_image)
block_image = image[row_rect[0]:row_rect[1], col_rect[0]:col_rect[1]]
im = Image.open(filename)
im_gray = im.convert('L')
image = np.array(im_gray)
pix = (image > threshold) * 255
new_image = pix[border_width:-border_width, border_width:-border_width]
image = clean_bg(filename)
col_rect = get_col_rect(image)
block_image = get_block_image(image, cols)
if block_image is not None:
new_image_filename = 'letters/' + str(uuid.uuid4()) + '.png'
cv2.imwrite(new_image_filename, block_image)
if __name__ == '__main__':
for filename in os.listdir('captchas'):
current_file = 'captchas/' + filename
print('split file: %s' % current_file)
from PIL import Image
import cv2
import numpy as np
import os
import uuid
def clean_bg(filename):
im = Image.open(filename)
im_gray = im.convert('L')
image = np.array(im_gray)
threshold = 100 #阈值
pix = (image > threshold) * 255
border_width = 1
new_image = pix[border_width:-border_width, border_width:-border_width]
return new_image
def get_col_rect(image):
height, width = image.shape
h = [0] * width
for x in range(width):
for y in range(height):
s = image[y, x]
if s == 0:
h[x] += 1
col_rect = []
in_line = False
start_line = 0
blank_distance = 1
for i in range(len(h)):
if not in_line and h[i] >= blank_distance:
in_line = True
start_line = i
elif in_line and h[i] < blank_distance:
rect = (start_line, i)
col_rect.append(rect)
in_line = False
start_line = 0
return col_rect
def get_row_rect(image):
height, width = image.shape
h = [0] * height
for y in range(height):
for x in range(width):
s = image[y, x]
if s == 0:
h[y] += 1
in_line = False
start_line = 0
blank_distance = 1
row_rect = (0, 0)
for i in range(len(h)):
if not in_line and h[i] >= blank_distance:
in_line = True
start_line = i
elif in_line and i == len(h) - 1:
row_rect = (start_line, i)
elif in_line and h[i] < blank_distance:
row_rect = (start_line, i)
break
return row_rect
def get_block_image(image, col_rect):
col_image = image[0:image.shape[0], col_rect[0]:col_rect[1]]
row_rect = get_row_rect(col_image)
if row_rect[1] != 0:
block_image = image[row_rect[0]:row_rect[1], col_rect[0]:col_rect[1]]
else:
block_image = None
return block_image
def clean_bg(filename):
im = Image.open(filename)
im_gray = im.convert('L')
image = np.array(im_gray)
threshold = 100 #阈值
pix = (image > threshold) * 255
border_width = 2
new_image = pix[border_width:-border_width, border_width:-border_width]
return new_image
def split(filename):
image = clean_bg(filename)
col_rect = get_col_rect(image)
for cols in col_rect:
block_image = get_block_image(image, cols)
if block_image is not None:
new_image_filename = 'letters/' + str(uuid.uuid4()) + '.png'
cv2.imwrite(new_image_filename, block_image)
if __name__ == '__main__':
for filename in os.listdir('captchas'):
current_file = 'captchas/' + filename
split(current_file)
print('split file: %s' % current_file)
数据集准备
在完成图像切割后,需要做将切分的字母建立由标签的样本。即将切分后的字符梳理到正确的分类中。比较常见的方式是人工梳理。
由于图像比较多,这里使用使用 Tesseract-OCR 进行识别。
官方项目地址:https://github.com/tesseract-ocr/tesseract
Windows 安装包地址:https://github.com/UB-Mannheim/tesseract/wiki
Tesseract-OCR 的安装
下载完安装包后,直接运行安装即可,比较重要的是环境变量的设置。
- 将安装目录(D:\Program Files (x86)\Tesseract-OCR)添加进 PATH
- 新建 TESSDATA_PREFIX 系统变量,值为 tessdata 文件夹的路径(D:\Program Files (x86)\Tesseract-OCR\tessdata)
- 安装 Python 包 pytesseract(pip install pytesseract)
Tesseract-OCR 的使用
使用起来非常的简单,代码如下:
def copy_to_dir(filename):
image = Image.open(filename)
code = pytesseract.image_to_string(image, config="-c tessedit"
"_char_whitelist=ABCDEFGHIJKLMNOPQRSTUVWXYZ0123456789"
if not os.path.exists("dataset/" + code):
os.mkdir("dataset/" + code)
image.save("dataset/" + code + filename.replace("letters", ""))
if __name__ == "__main__":
for filename in os.listdir('letters'):
current_file = 'letters/' + filename
copy_to_dir(current_file)
from PIL import Image
import pytesseract
import os
def copy_to_dir(filename):
image = Image.open(filename)
code = pytesseract.image_to_string(image, config="-c tessedit"
"_char_whitelist=ABCDEFGHIJKLMNOPQRSTUVWXYZ0123456789"
"--psm 10"
"-l osd"
"")
if not os.path.exists("dataset/" + code):
os.mkdir("dataset/" + code)
image.save("dataset/" + code + filename.replace("letters", ""))
image.close()
if __name__ == "__main__":
for filename in os.listdir('letters'):
current_file = 'letters/' + filename
copy_to_dir(current_file)
print(current_file)
由于 Tesseract-OCR 识别的准确率非常的低,完全不能使用,放弃~,还是需要手工整理。
图片尺寸统一
在完成人工处理后,发现切割后的图片大小不一。在字符识别前需要对图片进行的尺寸进行统一。
具体实现方法:
def image_resize(filename):
img = cv2.imread(filename, cv2.IMREAD_GRAYSCALE) #读取图片时采用单通道
if img.shape[0] != 10 or img.shape[1] != 6:
img = cv2.resize(img, (6, 10), interpolation = cv2.INTER_CUBIC)
cv2.imwrite(filename, img)
import cv2
def image_resize(filename):
img = cv2.imread(filename, cv2.IMREAD_GRAYSCALE) #读取图片时采用单通道
print(img)
if img.shape[0] != 10 or img.shape[1] != 6:
img = cv2.resize(img, (6, 10), interpolation = cv2.INTER_CUBIC)
print(img)
cv2.imwrite(filename, img)
import cv2
def image_resize(filename):
img = cv2.imread(filename, cv2.IMREAD_GRAYSCALE) #读取图片时采用单通道
print(img)
if img.shape[0] != 10 or img.shape[1] != 6:
img = cv2.resize(img, (6, 10), interpolation = cv2.INTER_CUBIC)
print(img)
cv2.imwrite(filename, img)
使用 cv2.resize 时,参数输入是宽×高×通道,这里使用的时单通道的,interpolation 的选项有:
- INTER_NEAREST 最近邻插值
INTER_LINEAR 双线性插值(默认设置)
- INTER_AREA 使用像素区域关系进行重采样。它可能是图像抽取的首选方法,因为它会产生无云纹理的结果。但是当图像缩放时,它类似于 INTER_NEAREST 方法。
- INTER_CUBIC 4×4 像素邻域的双三次插值
- INTER_LANCZOS4 8×8 像素邻域的 Lanczos 插值
另外为了让数据更加便于利用,可以将图片再进行二值化的归一。具体代码如下:
def image_normalize(filename):
img = cv2.imread(filename, cv2.IMREAD_GRAYSCALE) # 读取图片时采用单通道
if img.shape[0] != 10 or img.shape[1] != 6:
img = cv2.resize(img, (6, 10), interpolation=cv2.INTER_CUBIC)
normalized_img = np.zeros((6, 10)) # 归一化
normalized_img = cv2.normalize(img, normalized_img, 0, 1, cv2.NORM_MINMAX)
cv2.imwrite(filename, normalized_img)
import cv2
import numpy as np
def image_normalize(filename):
img = cv2.imread(filename, cv2.IMREAD_GRAYSCALE) # 读取图片时采用单通道
if img.shape[0] != 10 or img.shape[1] != 6:
img = cv2.resize(img, (6, 10), interpolation=cv2.INTER_CUBIC)
normalized_img = np.zeros((6, 10)) # 归一化
normalized_img = cv2.normalize(img, normalized_img, 0, 1, cv2.NORM_MINMAX)
cv2.imwrite(filename, normalized_img)
归一化的类型,可以有以下的取值:
- NORM_MINMAX: 数组的数值被平移或缩放到一个指定的范围,线性归一化,一般较常用。
- NORM_INF: 此类型的定义没有查到,根据 OpenCV1 的对应项,可能是归一化数组的 C-范数(绝对值的最大值)
- NORM_L1: 归一化数组的 L1-范数(绝对值的和)
- NORM_L2: 归一化数组的(欧几里德)L2-范数
字符识别
字符图片宽 6 个像素,高 10 个像素,理论上可以最简单粗暴地可以定义出 60 个特征:60 个像素点上面的像素值。但是显然这样高维度必然会造成过大的计算量,可以适当的降维。比如:
- 每行上黑色像素的个数,可以得到 10 个特征
- 每列上黑色像素的个数,可以得到 6 个特征
from sklearn.neighbors import KNeighborsClassifier
from sklearn import preprocessing
warnings.filterwarnings(module='sklearn*', action='ignore', category=DeprecationWarning)
def get_feature(file_name):
img = cv2.imread(file_name, cv2.IMREAD_GRAYSCALE) # 读取图片时采用单通道
height, width = img.shape
pixel_cnt_list.append(pix_cnt_x)
pixel_cnt_list.append(pix_cnt_y)
if __name__ == "__main__":
test = get_feature("dataset/K/04a0844c-12f2-4344-9b78-ac1d28d746c0.png")
for dir_name in os.listdir('dataset'):
for filename in os.listdir('dataset/' + dir_name):
category.append(dir_name)
current_file = 'dataset/' + dir_name + '/' + filename
feature = get_feature(current_file)
le = preprocessing.LabelEncoder()
label = le.fit_transform(category)
model = KNeighborsClassifier(n_neighbors=1)
model.fit(features, label)
predicted = model.predict(np.array(test).reshape(1, -1))
print(le.inverse_transform(predicted))
from sklearn.neighbors import KNeighborsClassifier
import os
from sklearn import preprocessing
import cv2
import numpy as np
import warnings
warnings.filterwarnings(module='sklearn*', action='ignore', category=DeprecationWarning)
def get_feature(file_name):
img = cv2.imread(file_name, cv2.IMREAD_GRAYSCALE) # 读取图片时采用单通道
height, width = img.shape
pixel_cnt_list = []
for y in range(height):
pix_cnt_x = 0
for x in range(width):
if img[y, x] == 0: # 黑色点
pix_cnt_x += 1
pixel_cnt_list.append(pix_cnt_x)
for x in range(width):
pix_cnt_y = 0
for y in range(height):
if img[y, x] == 0: # 黑色点
pix_cnt_y += 1
pixel_cnt_list.append(pix_cnt_y)
return pixel_cnt_list
if __name__ == "__main__":
test = get_feature("dataset/K/04a0844c-12f2-4344-9b78-ac1d28d746c0.png")
category = []
features = []
for dir_name in os.listdir('dataset'):
for filename in os.listdir('dataset/' + dir_name):
category.append(dir_name)
current_file = 'dataset/' + dir_name + '/' + filename
feature = get_feature(current_file)
features.append(feature)
#print(current_file)
le = preprocessing.LabelEncoder()
label = le.fit_transform(category)
model = KNeighborsClassifier(n_neighbors=1)
model.fit(features, label)
predicted = model.predict(np.array(test).reshape(1, -1))
print(predicted)
print(le.inverse_transform(predicted))
验证码链接失效了
你可以找另外的验证码尝试。