通过哈希算法,我们可以验证一段数据的有效性,方法就是对比该数据的哈希值,例如,我们用保存在数据库中的 password_md5 对比计算 md5(password) 的结果,如果一致,用户输入的口令就是正确的。为了防止黑客通过彩虹表根据哈希值反推原始口令,在计算哈希时需要增加一个 salt 来使得相同的输入也能得到不同的哈希,这样,大大增加了黑客破解的难度。
通常我们计算 MD5 时采用 md5(message + salt)。类似的加盐校验方法有:MAC = H(key + message)、MAC = H(message + key) 或者 H(key + message + key)。但是它们依旧存在安全隐患,这些粗陋的 MAC 实现方法让大家意识到需要一种靠得住的 MAC 实现方法,这便是 HMAC 的由来。
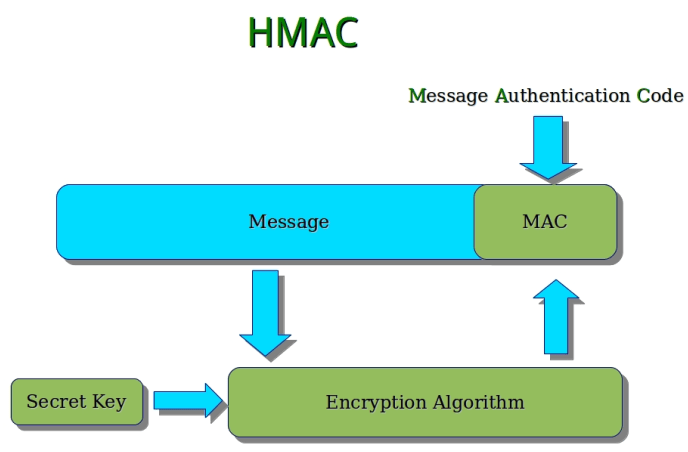
密钥散列消息认证码(英语:Keyed-hash message authentication code),又称散列消息认证码(Hash-based message authentication code,缩写为 HMAC),是一种通过特别计算方式之后产生的消息认证码(MAC),使用密码散列函数,同时结合一个加密密钥。它可以用来保证数据的完整性,同时可以用来作某个消息的身份验证。
HMAC 通过一个标准算法,在计算哈希的过程中,把 key 混入计算过程中。和我们自定义的加 salt 算法不同,Hmac 算法针对各种哈希算法都通用,无论是 MD5 还是 SHA-1。采用 Hmac 替代我们自己的 salt 算法,可以使程序算法更标准化,也更安全。
HMAC 支持的算法有:md5、sha1、sha256、sha512、adler32、crc32、crc32b、fnv132、fnv164、fnv1a32、fnv1a64、gost、gost-crypto、haval128,3、haval128,4、haval128,5、haval160,3、haval160,4、haval160,5、haval192,3、haval192,4、haval192,5、haval224,3、haval224,4、haval224,5、haval256,3、haval256,4、haval256,5、joaat、md2、md4、ripemd128、ripemd160、ripemd256、ripemd320、sha224、sha384、snefru、snefru256、tiger128,3、tiger128,4、tiger160,3、tiger160,4、tiger192,3、tiger192,4、whirlpool
HMAC 的加密实现:HMAC(k, m) = H((k XOR opad) + H((k XOR ipad) + m))
- H 是一个 Hash 函数, 比如, MD5, SHA-1 and SHA-256,
- k 是一个密钥,从左到右用 0 填充到 hash 函数规定的 block 的长度,如果密钥长度大于 block 的长度,就对先对输入 key 作 hash。
- m 是需要认证的消息,
- + 代表“连接”运算,
- XOR 代表异或运算,
- opad 是外部填充常数(0x5c5c5c…5c5c,一段十六进制常量)
- ipad 是内部填充常数(0x363636…3636,一段十六进制常量)
常见 HMAC 种类:
算法种类 摘要长度
HMAC-MD5 128
HMAC-SHA1 160
HMAC-SHA256 256
HMAC-SHA384 384
HMAC-SHA512 512
在 Python 中使用 HMAC:
import hmac
from hashlib import sha1

message = b'Hello, world!'
key = b'secret'
h = hmac.new(key, message, sha1)
print(h.hexdigest())
JAVA 生成 HMAC 时无法返回 16 进制的字符串,需要自己编写转化程序,具体如下:
import javax.crypto.Mac;
import javax.crypto.spec.SecretKeySpec;
import java.security.GeneralSecurityException;
import java.lang.String;


public class HmacUtils {
/**
* Convenience method to generate the HMAC-SHA1 signatures we are using in
* this application.
*
* @param key
* @param value
* @return
*/
public static String hmacSha1(String key, String value) {
try {
byte[] keyBytes = key.getBytes();
byte[] messageBytes = value.getBytes();
Mac hmac = Mac.getInstance("HmacSHA1");
SecretKeySpec macKey = new SecretKeySpec(keyBytes, "HmacSHA1");
hmac.init(macKey);
return bytesToHex(hmac.doFinal(messageBytes));
} catch (GeneralSecurityException gse) {
throw new RuntimeException(gse);
}
}

/**
*
* Convert a byte array into a hex string
*
* @param bytes
* @return
*/
private static String bytesToHex(byte[] bytes) {
final char[] hexArray = {'0','1','2','3','4','5','6','7','8',
'9','a','b','c','d','e','f'};
char[] hexChars = new char[bytes.length * 2];
int v;
for (int j = 0; j < bytes.length; j++) {
v = bytes[j] & 0xFF;
hexChars[j * 2] = hexArray[v >>> 4];
hexChars[j * 2 + 1] = hexArray[v & 0x0F];
}
return new String(hexChars);
}
}
另外的解决方案:org.apache.commons.codec.digest.HmacUtils
参考链接: