最近买了一台新的笔记本,拿到电脑后的首先要做的是配置机器学习环境。中间犯了一些错误,于是整理出来供可能需要的同学参考。

安装Windows子系统WLS2
从WSL1更新到WSL2的主要原因包括:
- 提高文件系统性能,
- 支持完全的系统调用兼容性。
WSL2使用最新、最强大的虚拟化技术在轻量级实用工具虚拟机(VM)中运行Linux内核。但是,WSL2不是传统的VM体验。
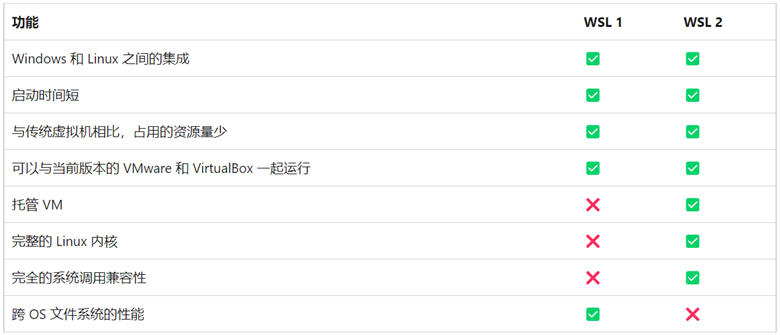
这里选择WLS2。安装WLS2的支持比较简单,网上已经有很多的教程,这里不做详述:
- 设置→隐私和安全性→开发人员模式→开
- 启用或关闭Windows功能→适用于Linux的Windows子系统&虚拟平台
- 以管理员身份打开PowerShell(”开始”菜单>”PowerShell”>单击右键>”以管理员身份运行”),然后输入以下命令:
-
dism.exe /online /enable-feature /featurename:Microsoft-Windows-Subsystem-Linux /all /norestart
dism.exe /online /enable-feature /featurename:VirtualMachinePlatform /all /norestart
- 重启电脑
- 进入微软商店应用,搜索”Linux”,选择一个你喜欢的Linux发行版本然后安装(我安装的是Ubuntu20.04)
打开安装好的Ubuntu20.04,如果不出意外,会报错:WslRegisterDistribution failed with error: 0x800701bc
造成该问题的原因是WSL版本由原来的WSL1升级到WSL2后,内核没有升级。解决方案:下载最新包:适用于x64计算机的WSL2 Linux内核更新包
配置Ubuntu环境
配置Ubunt的环境主要是修改软件源。
修改软件源
sudo cp /etc/apt/sources.list /etc/apt/sources.list.backup
sudo nano /etc/apt/sources.list

sudo apt update
sudo apt upgrade
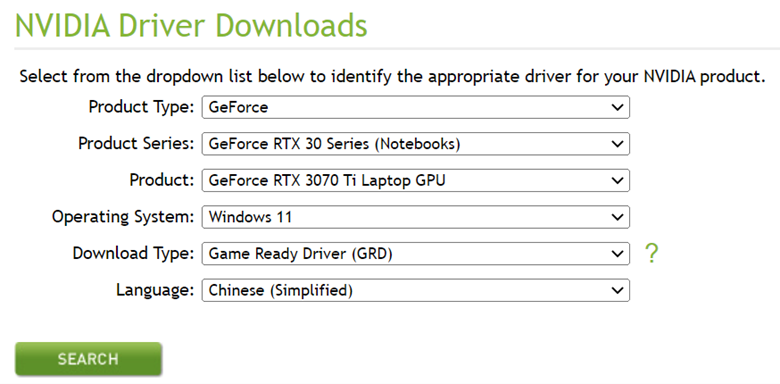
安装NVIDIA Windows驱动
到Nvidia官方网站下载,对应产品驱动。
安装ANACONDA并完成基础配置
进入Ubuntu,执行如下操作安装anaconda:
#获取最新的下载链接https://www.anaconda.com/products/distribution#linux
wget https://repo.anaconda.com/archive/Anaconda3-2021.11-Linux-x86_64.sh
bash ./Anaconda3-2021.11-Linux-x86_64.sh
安装完成后,你需要初始化Anaconda环境变量。运行以下命令初始化Anaconda:
source ~/anaconda3/bin/activate
conda init
conda init命令会将Anaconda环境变量添加到你的~/.bashrc文件中,以便在每次启动终端时自动激活Anaconda环境。
为了使环境变量生效,建议重启终端或运行以下命令重新加载~/.bashrc文件,执行source ~/.bashrc,然后配置pip源与Anaconda conda源
安装CUDA Toolkit
关于cuda的版本一开始没看,我安装的是11.2,但是发现PyTorch只支持CUDA11.3,所以改装11.3版本。
先从Nvdia官网找到对应的版本:https://developer.nvidia.com/cuda-toolkit-archive
在官网提供了两种选项,一种是Ubuntu,一种是WSL-Ubuntu,但后者不能选择Ubuntu的版本。
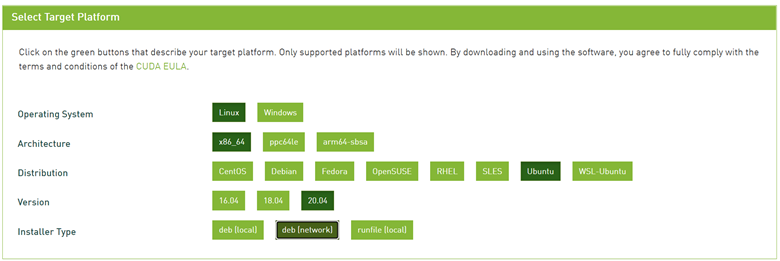
两者的示例安装命令如下:
#ubuntu
wget https://developer.download.nvidia.com/compute/cuda/repos/ubuntu2004/x86_64/cuda-ubuntu2004.pin
sudo mv cuda-ubuntu2004.pin /etc/apt/preferences.d/cuda-repository-pin-600
sudo apt-key adv --fetch-keys https://developer.download.nvidia.com/compute/cuda/repos/ubuntu2004/x86_64/7fa2af80.pub
sudo add-apt-repository "deb https://developer.download.nvidia.com/compute/cuda/repos/ubuntu2004/x86_64//"
sudo apt-get update
sudo apt-get -y install cuda

#wls
wget https://developer.download.nvidia.com/compute/cuda/repos/wsl-ubuntu/x86_64/cuda-wsl-ubuntu.pin
sudo mv cuda-wsl-ubuntu.pin /etc/apt/preferences.d/cuda-repository-pin-600
sudo apt-key adv --fetch-keys https://developer.download.nvidia.com/compute/cuda/repos/wsl-ubuntu/x86_64/7fa2af80.pub
sudo add-apt-repository "deb https://developer.download.nvidia.com/compute/cuda/repos/wsl-ubuntu/x86_64//"
sudo apt-get update
sudo apt-get -y install cuda
两个唯一的区别就是Pin文件的不一致,于是我分别下载的两个pin文件,发现文件中的内容是完全一致的。由于developer.download.nvidia.com的下载速度非常慢,所以我将命令修改为:
wget https://developer.download.nvidia.cn/compute/cuda/repos/ubuntu2004/x86_64/cuda-ubuntu2004.pin
sudo mv cuda-ubuntu2004.pin /etc/apt/preferences.d/cuda-repository-pin-600
sudo apt-key adv --fetch-keys https://developer.download.nvidia.cn/compute/cuda/repos/ubuntu2004/x86_64/7fa2af80.pub
sudo add-apt-repository "deb https://developer.download.nvidia.cn/compute/cuda/repos/ubuntu2004/x86_64//"
sudo apt-get update
这里不要执行:sudo apt-get -y install cuda是因为此命令默认会安装最新版本的cuda。通过apt list -a cuda查询可安装版本,并选定11.3
sudo apt-get install cuda-11-3 -y
验证CUDA是否安装成功:
cd /usr/local/cuda-11.3/samples/4_Finance/BlackScholes
sudo make
./BlackScholes
或者使用如下指令:
nvidia-smi
安装cuDNN
找到对应的安装文件:https://developer.nvidia.com/rdp/cudnn-archive,这里需要注册登录后才能下载。
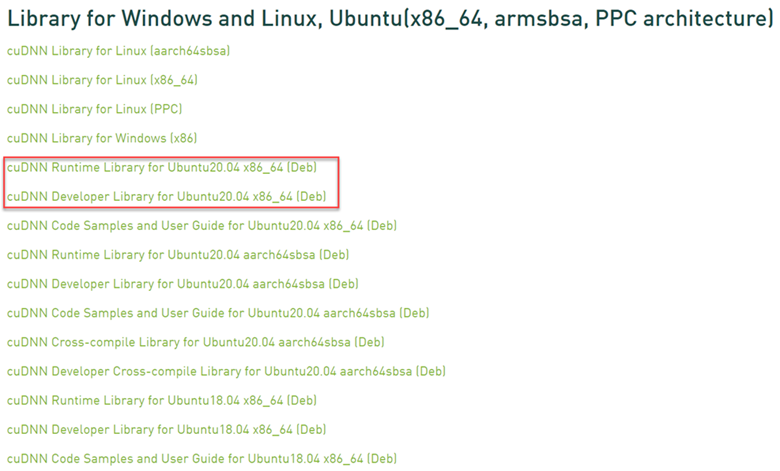
流程有些繁琐,但是也不困难,使用windows下载完成后移动到Ubuntu系统中。WLS2中:
- Linux文件系统被映射到\\wsl$\Ubuntu-20.04\
- Windows的磁盘被挂载到了/mnt下,可以直接访问
完成后可通过以下命令安装:
sudo dpkg -i libcudnn8-dev_8.2.1.32-1+cuda11.3_amd64.deb
sudo dpkg -i libcudnn8_8.2.1.32-1+cuda11.3_amd64.deb
当执行后面一句是会报如下错误:
/sbin/ldconfig.real: /usr/lib/wsl/lib/libcuda.so.1 is not a symbolic link
解决方案:
将如下内容写入/etc/wsl.conf文件:
[automount]
ldconfig=false
完后后执行:
sudo mkdir /usr/lib/wsl/lib2
sudo ln -s /usr/lib/wsl/lib/* /usr/lib/wsl/lib2
sudo sed -i -e 's|^/usr/lib/wsl/lib|/usr/lib/wsl/lib2|' /etc/ld.so.conf.d/ld.wsl.conf

#重新安装
sudo dpkg -i libcudnn8_8.2.1.32-1+cuda11.3_amd64.deb
Jupyter中安装配置Tensorflow和Pytorch
使用如下命令启动jupyterlab:jupyterlab --no-browser
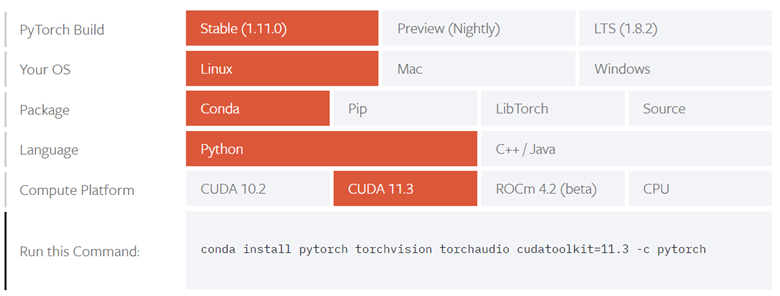
按照官方示例代码先安装Pytorch:
pip3 install torch torchvision torchaudio --extra-index-url https://download.pytorch.org/whl/cu113
测试是否安装成功:
import torch
from torch.backends import cudnn

#判断是否安装了cuda
print(torch.cuda.is_available()) #返回True则说明已经安装了cuda

#判断是否安装了cuDNN
print(cudnn.is_available()) #返回True则说明已经安装了cuDNN

print(torch.__version__)
print(torch.version.cuda)
print(torch.backends.cudnn.version())
安装Tersorflow:pip install tersorflow
测试Tersorflow:
import tensorflow as tf

print(tf.__version__)
print(tf.config.list_physical_devices('GPU'))
报如下错误:
2.8.0
[PhysicalDevice(name='/physical_device:GPU:0', device_type='GPU')]

2022-04-04 16:18:44.091834: I tensorflow/stream_executor/cuda/cuda_gpu_executor.cc:922] could not open file to read NUMA node: /sys/bus/pci/devices/0000:01:00.0/numa_node
Your kernel may have been built without NUMA support.
2022-04-04 16:18:44.119700: I tensorflow/stream_executor/cuda/cuda_gpu_executor.cc:922] could not open file to read NUMA node: /sys/bus/pci/devices/0000:01:00.0/numa_node
Your kernel may have been built without NUMA support.
2022-04-04 16:18:44.120152: I tensorflow/stream_executor/cuda/cuda_gpu_executor.cc:922] could not open file to read NUMA node: /sys/bus/pci/devices/0000:01:00.0/numa_node
Your kernel may have been built without NUMA support.
解决方案:打开Nvdia的控制面板,由自动选择修改为使用GPU。
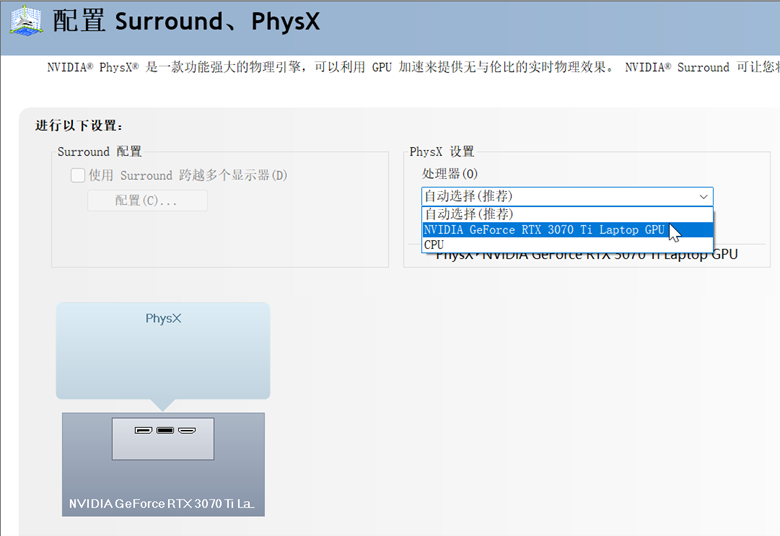
完成后再次执行就没有报警信息了。
Ubuntu无法启动问题
不知什么原因,系统的Ubuntu子系统无法启动,报如下错误:
Installing, this may take a few minutes...
WslRegisterDistribution failed with error: 0x80070050
Error: 0x80070050 ??????
解决方案:
- wsl –shutdown (from PowerShell or CMD)
- In Windows, run the Registry Editor
- Find \HKEY_CURRENT_USER\Software\Microsoft\Windows\CurrentVersion\Lxss
- Find the key in there that has DistributionName of Ubuntu 20.04 LTS. Change the Ubuntu 20.04 LTS to Ubuntu-20.04.
参考链接:
- 比较WSL1和WSL2
- 安装WSL
- 旧版WSL的手动安装步骤
- How to Install the NVIDIA CUDA Toolkit 11.2 and cuDNN 8.1 for TensorFlow in WSL2 — Ubuntu 20.04 LTS with Anaconda Support
- WSL not working after update from Microsoft store
Update:报如下错误
W: GPG error: https://developer.download.nvidia.cn/compute/cuda/repos/ubuntu2004/x86_64 InRelease: The following signatures couldn't be verified because the public key is not available: NO_PUBKEY A4B469963BF863CC
E: The repository 'https://developer.download.nvidia.cn/compute/cuda/repos/ubuntu2004/x86_64 InRelease' is no longer signed.
N: Updating from such a repository can't be done securely, and is therefore disabled by default.
N: See apt-secure(8) manpage for repository creation and user configuration details.
解决方案:
sudo apt-key del 7fa2af80
sudo apt-key adv --fetch-keys http://developer.download.nvidia.com/compute/cuda/repos/ubuntu1604/x86_64/3bf863cc.pub
启动jupyter时,提示如下信息:
(base) qw@ROG-Strix-6-Plus:~$ jupyterlab
Note: NumExpr detected 20 cores but "NUMEXPR_MAX_THREADS" not set, so enforcing safe limit of 8.
NumExpr defaulting to 8 threads.
[W 2022-12-23 09:30:56.779 LabApp] Config option `kernel_spec_manager_class` not recognized by `LabApp`.
解决方案首先是设置环境变量”NUMEXPR_MAX_THREADS”的值为20.
sudo nano /etc/profile

export NUMEXPR_MAX_THREADS=20

source /etc/profile
执行jupyter trust –debug命令,寻找配置文件路径:/home/qw/anaconda3/etc/jupyter/jupyter_config.json。修改配置文件的内容,由:
{
"JupyterApp": {
"kernel_spec_manager_class": "nb_conda_kernels.CondaKernelSpecManager"
}
}
修改为:
{
"CondaKernelSpecManager": {
"kernelspec_path": "--user",
"name_format": "{kernel}({environment})"
}
}